
 I have never carved anything out of wood before, so I won't even pretend to know what I'm doing, but as usual I wanted to share in case anyone can learn from what I have done. I started off by gluing 9 pine boards together, forming a solid block measuring 6.75 inches wide, 9 inches deep and 12 inches tall. These were clamped together and left to dry overnight. I then traced the shape of the head profile on both sides of the block, and the widest head circumference on the top.
 I tried to remove as much material as possible with the table saw first, so I made angled cuts at all four corners. This gave me a rough octagon shape.
 Next I made a series of cuts on the table saw, moving the fence about a quarter inch between cuts. The height was adjusted each time to follow the contour of the outlined profile.
 Here we have the front...
 ...and the rear.
At this stage I chipped out the slits with a hammer and chisel, giving me a rough profile shape.

 Next, I made a couple more cuts at the table saw, taking out a slice at the top of the head, and at the neck. The less I have to take out with the micro plane and chisels, the better. A very cubist-looking rough cut.
 Now the shaping begins. I started to round off the form using a micro plane.
 I used paper guides to help me get the proportions right - the idea came from a book I just read about carved wooden masks for the Japanese Noh Theater. Apparently, the mask makers use paper guides as well.
  These were the main carving implements used on this project. The micro planes were handy for large areas that needed to be removed, and the Pfeil chisels were for the more subtle, nuanced work. These chisels come sharp, and cut through the wood cleanly and beautifully. I bought 3 sizes for this project, one with a slight sweep (or curve) a 2/25, one with a more pronounced curve (the 6/25) and a small one with a deep sweep (the 9/13). For those of you who care, the first number refers to the depth of the sweep, the second number is the width of the blade in millimeters.
 It's the first time I have carved with chisels, and I must say it wasn't as difficult as I thought it would be.

At this point we skip way ahead, as I didn't take many progress shots along the way. Suffice to say there were chisels involved, lots of hammering and sweating, some cursing, a trip or two to the hardware store, sore muscles, heat exhaustion and lingering body aches. The 5-inch deep pile of wood shavings on the floor is testament to the battle that took place, and the end result was this not-too-shabby wooden form:
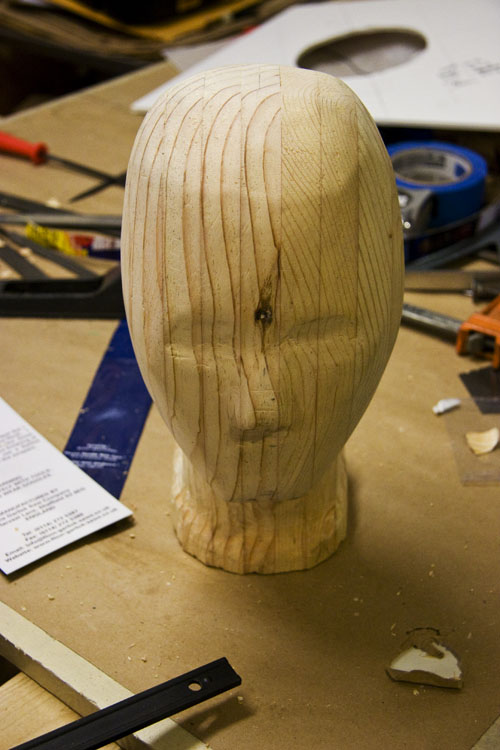 No, the knot in the middle of the forehead was not intentional... It just turned out that way!
 I really like the way the wood grain runs top to bottom, helping describe the form. Seeing the different layers is pretty cool as well...
 The grain in back almost makes a bulls-eye.
 Overall, I feel like I learned a lot from this project. I have now tackled a carving project, and it didn't turn out too bad. I would do a few things differently next time (like leaving a bit more material to work with at the chin and nose), but in general I am getting over any fear I might have had about carving in wood. Just do it, right? Until next time...
wooow!!! great job Christopher !! congrats ;)
ReplyDeleteI must say you are an amazing and versatile artist, craftsman and creator! I am in awe of your work and your ability to succeed at what you put your mind and hands to. I could die happy in one of your creations.
ReplyDeleteThanks LDD!
ReplyDeletewow thats really good for a first attempt. you better be careful that you don't get folks coming up to you saying...'hmm so you can carve wood to a custom size....how hard would it be to make a custom fitted and measured bondage coffin or sarcophagus ...' lol
ReplyDeleteDear thisgirl,
ReplyDeleteYou know, that though had already crossed my mind... There is a sign shop nearby that makes huge molded signs out of a thick plastic that is melted and vacuum-formed to a wooden form. If you carved a full figure, it could be used to make an inescapable plastic bondage coffin! I wonder how much they would charge...
hi christopher
ReplyDeletela cagoule en cuir noir est extraordinaire, peux tu m'en faire une?
the leather black hood is very great is it possible to make one for me?
toucuir@yahoo.fr