
 I just finished up a male version of the leather head case "experiment" I've been working on lately. This has involved making a molded-leather head "case" of sorts using a carved wooden hood form as a foundation, and a very heavy (7 to 8 oz.) vegetable-tanned leather. I was most curious to see what this type of hood actually felt like on.
 To back up just a bit, this is what the hood looked like fresh off of the form, after drying overnight. To see the earlier steps which were the same as the female hood, look here.
 Just like with the female version, I used the same pattern as if I was making the hood in a garment-weight leather. In this case, I used a split-chin pattern, which I have found useful when working with heavy-weight leathers. I was hoping the chin might be able to create a cool-looking form, but if I was doing this project again, I wouldn't use the split-chin design. I think, if the leather is worked enough, I could get it to take the contour of the chin without that seam.
 Another issue I ran into was the wrinkles created when removing the hood from the wooden form. If I was to do this as a production piece, I would probably make a dedicated wood head with a wedge-shaped piece that could be removed, so the force of removing the hood won't leave behind these wrinkled marks. With the garment or upholstery leather I usually use, it stretches enough to come free of the form without damage.
 For the coloring, I used a dye-prep first to remove any waxy residue or oils from the hide, and to help the dye penetrate deep into the leather.
 For the actual dye color, I used Fiebing's USMC black - the blackest black there is... This is great stuff!
 For the rough edges, I used edge kote - this helps bind the edge fibers together and helps create a smooth finish.
 It takes multiple coats to get a good, rich black. You basically brush or daub the dye on, let it dry for a few minutes, then apply another coat. Each time, it gets darker, and darker... my precious!
 I would probably do the edges first next time... in this case I've edge-coated the front and side seams and the nose-hole openings.
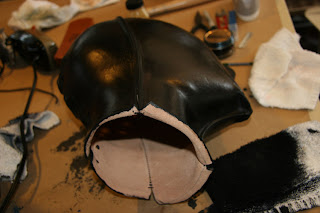
 Also, edge-coat along the edge of the bottom opening.
 Once it's to a level of blackness you like, you buff the hell out of it to get a nice, shiny finish.
 I even went a little crazy and put some black shoe polish on it - just to see what it would do. It gave the whole piece a waxy, shiny - almost plastic look? It's kind of hard to see it in the photos. Don't know if I would do that again next time...
 So, in the end, how did it feel? Honestly, it kind of feels like having a bucket on your head. You can hear the sound of your own breathing very loud. It isn't hard to breathe at all, as there is some space between your head and the hood. I imagine there would be in any case, unless you actually were working from a cast of someone's head - (file away under: ideas for future projects). The fit made me wish there was a thin layer of foam between the hood and my head - to create that combination of all-over pressure and sensory deprivation that other hoods provide. But visually, the hood is quite stunning. It lends itself to having straps and attachment points riveted all over it. And the psychological heft of such a heavy piece gives it a lot of weight - both physically and mentally. It definitely has the feel of a punishment slut's dream hood...
 Just like with the female version, I used the same pattern as if I was making the hood in a garment-weight leather. In this case, I used a split-chin pattern, which I have found useful when working with heavy-weight leathers. I was hoping the chin might be able to create a cool-looking form, but if I was doing this project again, I wouldn't use the split-chin design. I think, if the leather is worked enough, I could get it to take the contour of the chin without that seam.
 Another issue I ran into was the wrinkles created when removing the hood from the wooden form. If I was to do this as a production piece, I would probably make a dedicated wood head with a wedge-shaped piece that could be removed, so the force of removing the hood won't leave behind these wrinkled marks. With the garment or upholstery leather I usually use, it stretches enough to come free of the form without damage.
 For the coloring, I used a dye-prep first to remove any waxy residue or oils from the hide, and to help the dye penetrate deep into the leather.
 For the actual dye color, I used Fiebing's USMC black - the blackest black there is... This is great stuff!
 For the rough edges, I used edge kote - this helps bind the edge fibers together and helps create a smooth finish.
 It takes multiple coats to get a good, rich black. You basically brush or daub the dye on, let it dry for a few minutes, then apply another coat. Each time, it gets darker, and darker... my precious!
 I would probably do the edges first next time... in this case I've edge-coated the front and side seams and the nose-hole openings.
 Also, edge-coat along the edge of the bottom opening.
 Once it's to a level of blackness you like, you buff the hell out of it to get a nice, shiny finish.
 I even went a little crazy and put some black shoe polish on it - just to see what it would do. It gave the whole piece a waxy, shiny - almost plastic look? It's kind of hard to see it in the photos. Don't know if I would do that again next time...
 So, in the end, how did it feel? Honestly, it kind of feels like having a bucket on your head. You can hear the sound of your own breathing very loud. It isn't hard to breathe at all, as there is some space between your head and the hood. I imagine there would be in any case, unless you actually were working from a cast of someone's head - (file away under: ideas for future projects). The fit made me wish there was a thin layer of foam between the hood and my head - to create that combination of all-over pressure and sensory deprivation that other hoods provide. But visually, the hood is quite stunning. It lends itself to having straps and attachment points riveted all over it. And the psychological heft of such a heavy piece gives it a lot of weight - both physically and mentally. It definitely has the feel of a punishment slut's dream hood...
No comments:
Post a Comment