Friday, April 29, 2011
Locking bondage hood v2.0
Hello all! I'm posting some images of the hood I just finished up that goes with the armbinder from my last post. I decided to re-do this piece as well, as the tongue didn't allow an easy on-and-off experience for the client, and I felt that I could do a little better. Based on the photos and feedback they sent, I knew there were some things I wanted to change.
The tongue on this piece is made a bit larger, and made of a lighter matching leather, that will allow the tongue to stretch a bit more than in the previous version. It should make getting it on and off easier.
I also extended parts of the rear panels slightly, which should result in the lacing panels coming slightly closer together when the laces are pulled tight... Still not touching, though - it's always nice to have room to go tighter if you need to, don't you think?
Last time there was also a problem with a grommet whose backing washer came undone. This is probably because I was using a grommet that was too small for the thickness of the leather. I was trying to keep everything petite since the scale and size of these restraints is so small. Since I up sized the grommets on the armbinder, I wanted to also up size the grommets on the hood, to make sure both pieces would match perfectly.
This is a real intense hood to wear, as the leather is quite thick. It is soft, and will stretch some (especially over time), but the feeling inside this hood would be quite severe. Not for panickers or the claustrophobic... Unless you want to be really mean! For serious players only.
This time I tried a different approach on the locking strap. I sewed the strap from two parts, using the same leather as the hood on the outside, and a patent leather on the inside. I think it results in a thinner strap, and the patent (being stiffer) doesn't stretch as much. Stronger and thinner was the goal.
I think it came out nice...
Also, I managed to find a small D-ring (shorter than the hasp I used last time), and made the connection with a single rivet. It looks really clean, and anything that reduces bulk around the neck is a good thing. I think this is my new default method.
One final tweak to make sure it is easy to get this hood on: a zipper on the tongue itself. This allows you to open the rear quite wide. Pull the zipper down, and no hair in the laces - good times.
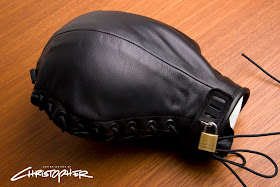
This hood (and matching armbinder) came out really great. Now that both pieces are done, I get to send them off to the client, and hopefully they are happy with their new toys as well.
I can't wait to hear what they think!
Monday, April 25, 2011
Square armbinder v2.0
These are pictures of the square armbinder project I recently re-completed this past weekend. Yes, it seems like everything is taking 2 tries these days (welcome to perfectionist central)... Have I mentioned sometimes making leather bondage gear from scratch is a challenging thing to do?
Seriously, there were some problems with the first version of this restraint, and I wanted to make everything as right as I possibly could. In a quest for a tight fit we ended up with a restraint that was too much of a struggle to get into. Note for future reference: If it takes more than an hour to get into your restraint, it is probably too tight!
I also had reservations about the rolled seam around the arm opening. In order to make it as strong as possible, I turned the edge of the opening before applying the leather edging. This created 2 thicknesses of leather, plus the 2 thicknesses of the rolled edge, for a total of 4 layers - I felt it might be too much, but it was something I couldn't be sure of until it was tried on by the client. Sure enough, it seemed like it was a bit too stiff in practice.
So, numerous changes were made to the pattern, some quite minor, others more extreme. The entire body of the restraint was made a little longer - about 3/4 inch. The goal was to loosen things up a bit, without compromising the "inescapability" of the first version. I didn't want to go too far.
The width was increased by about one-quarter of an inch on each side. This means the laces, when pulled tight, should get closer together in the rear, but still not quite touch.
Based on the photos I received from the client, I noticed a little slack at the bottom of the "bag" that encases the arms, so that lower contour line has been straightened out a little, for a tighter fit.
The zipper was made beefier - I am using a custom-ordered (direct from YKK) #10 black-oxidized brass zipper - the entire exciting 2-month process of obtaining this zipper will be the feature of a future post. It was not easy to get that zipper, let me tell you.
Finally, the tongue in the rear was widened by about 2 inches, which should make getting into this restraint much easier... It now opens to about 5 inches wide, compared to about 3 inches before.
Oh, and the grommets have been placed a little closer together - 1 inch spacing, vs. the 1.25 inches used last time.
And just completely list all the changes, the grommet moved up from the size "00" to just plain old "0" - it's a slightly larger grommet. There was a grommet failure on the previous version, where the back part of the grommet became separated from the front part. This probably stemmed from me using a grommet that was too small for the thickness of the leather, which kept the grommet from getting enough of a grip on the rear part. You see, the smaller the grommet, the shorter the length.
It was completely my fault, as I was trying to keep all the hardware as petite as possible on this petite piece. Sometimes slightly bigger is better. And sometimes it takes another try to get to everything "just right". Another lesson learned...
Thursday, April 21, 2011
F-suit v2.0
I finished up another f-suit this past weekend, and I think it came out very nice. This is my second attempt at a pointed-toe foot pocket for this client. The first one I made was too short at the toe, even after all the measurements and the prototype. I probably made too many changes between the prototype and the final, which is where the problem creeped in. I am hoping this one fits just perfect... fingers crossed!
Since we were making a new suit anyway, there were several other tweaks to the design: The arm pocket holes were enlarged to make getting in and out of the suit a bit easier. The collar was enlarged slightly - more room for a collar or hood underneath.
I also added a second tongue at the crotch so the zipper teeth could be completely covered on both sides when the zipper is opened. Clever idea from the client...
Finally, the bottom of the foot pocket is made to fit the outline of the client's foot.
Many great design ideas come from the people I work with, and it often surprises me with the types of ideas they have. I often have that "I wish I'd thought of that" feeling... There is always a different way of looking at things, and for me the collaboration is one of the best parts of doing custom work.
Thursday, April 14, 2011
Patent Butterfly Straitjacket photos
I finally had a chance to do a proper photo shoot with the black patent butterfly straitjacket I completed a while back. I paired it with the hood design I have been working on recently, which gives the ensemble an incredible integrated look.
The black patent cowhide is very restrictive, and oh-so fetishy. Unfortunately, it is really difficult to find the patent cow in just the right weight for restraint work. It's often too heavy, which is like working with cardboard, as it doesn't bend at all... and that makes it uncomfortable or impractical to use for making a straitjacket or armbinder.
The hood is actually made of a lighter-weight pig leather, which gives it a good amount of stretch, and really allows it to conform to the face. Unfortunately, that weight would not be strong enough to use for a straitjacket.
I just love the stuff, and hope to find a reliable supplier of the patent cow soon...
As a side note, I wanted to announce that I am no longer taking orders for custom work at this time. I have too many projects in the queue, and hope to finish them all up before taking on any new orders. It has been about a year since I started the blog, and I have been really overwhelmed with the positive response and feedback I have gotten as a result. Many creative and friendly kinky people have contacted me from all over the world, and it has been great to get to know you all. I am really impressed with the talent of some of my contacts, who produce incredible fetish and bondage works of their own.
If you already have contacted me for custom work, I am making my way through the queue, and will contact you as soon as I am ready to start your project in earnest. Thank you for your patience, and I look forward to making and sharing the many exciting, pervy projects that lie ahead.
Friday, April 1, 2011
Had to share...
Sometimes I am lucky enough to get an image of something I made in use from a client after a project is delivered. And occasionally, they also allow me to post the picture on my blog.
In this case, the slave involved happens to be completely gorgeous as well. I am just in awe of these beautiful shots of the recent square armbinder and hood project, tightly laced on...
Somtimes, all the hard work pays off...
I hope you all appreciate the images as much as I do. Dear client, Thank you so much for sharing!