Wednesday, January 16, 2013

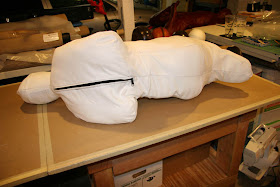
Kneeling Playsuit Pillow

A look at the pillow I made for the 2nd playsuit for the Vanilla Gallery show. As with the f-suit, I ended up making the exact same pattern in cloth for the kneeling playsuit that I had used on the leather version. I had to really take care to mark all the pieces clearly - because they are very easy to mix up, especially early in the process.

This stack is from the toes to the front of the chest:

The hood...


Sub-assembled top half and bottom half:


And, everything joined together: 

 I love the look of these forms, they just come alive even stuffed with polyester fiber! 

 On this one, I did end up putting a zipper on the back so they can add more fill at the gallery if necessary. 
 Here is the moment of truth: How far down will the vacuum-bag reduce the pillow? I started with the f-suit:
 Damn, that was pretty awesome! It worked... The texture goes from being like a pillow, to being dense and semi-hard, like ice-cream. It's weird...
 But after a few tries, I got both pillows down to size...
 Two full-body sized pillow forms, shrunk down to fit into a 12 by 15 by 6-inch deep box. Awesome! 

A little animation of the stuffing:


F-suit Pillow

The f-suit that I made for the Vanilla Gallery show was designed to be shown suspended from the ceiling, so I needed to make something to go inside of the suit so it would look good while on display. 

The gallery asked how they could show it, and at first I thought I could just send them the suit and let them stuff it with packing peanuts or newspapers or something... But I figured it might not look very good - it could end up being misshaped or lumpy. 

Next my idea was to make a simplified pattern for a stuffed "pillow" form, but I was running out of time to develop a whole new pattern... 

So, I ended up just making the same pattern as the leather version but in cloth, and stuffing it with polyester fiberfill. A large part of the time in making the suit in leather is managing and gluing down all the seam allowances - something I wouldn't need to worry about with the cloth version. 

I wanted to use enough fill to give the body a good shape, but not so much that shipping it to Japan would cost a fortune. My hope was to use a vacuum-seal storage bag to reduce the "pillow" to manageable size for mailing. 

The good thing is the pillow came out pretty cool. It had a good shape, and filled the f-suit nicely. Once I had it stuffed, I could use it to figure out the proper dimensions for the hanging frame...


Monday, January 14, 2013

Black Cherries outtakes...

Karen Hsiao just posted a bunch of outtakes and behind-the-scenes shots from her more recent photo shoots on her blog... check 'em out. I think they're just beautiful. 

In case you just dropped in, I've been working with her on the props and gear for her Black Cherries series, which we both just wrapped up. (I made the conical hat in the shots below... in leather, of course.)

Her photos and my f-suit and kneeling playsuit are going on display at Vanilla Gallery in Tokyo on February 4th. If you happen to be in Japan, remember to drop by. And don't forget your 500 yen admission (about $5.62 US). 


Saturday, January 12, 2013

Kneeling Restraint for Vanilla Gallery

I had 3 ideas for designs I wanted to create when the opportunity for the Vanilla Gallery show came about. One was the red suspended f-suit, as shown in my recent posts. My second concept was a puffy 2-layer sleepsack, similar to the puffy hood I made that Karen Hsiao had already shot. (Unfortunately the sleepsack got nixed due to space limitations at the gallery.) And the third idea was for a "kneeling-position" full body restraint - something I hadn't seen actually made anywhere else before.

It's part of a set of ideas I have for what I call posture-suits: restraints that put the wearer in a certain position, usually limit or restrict movement to varying degrees, and have for the most part the quality of total enclosure. 

This isn't just a sleepsack bent at the knees, but more a combination of hood, square armbinder, and a leg pocket that holds both legs together in the same space. I wanted the zipper to run from the toes in the back to the top of the hood. Based on the wrap, and because the arms were to be held behind the back, it became clear that the breasts should have shaped contours to emphasize their form. 


I liked the fact that there could be a single zipper, and that it would allow the hair to be pulled out at the top for a ponytail. I did add 2 additional pulls so there can be access anywhere along the zipper path in case you want to. 


This leather is so soft and smooth, with a tight grain and a buttery, silky feel. 


One of the inspirations for this restraint is the classic Japanese style of sitting, with the thighs on the calves, and often the feet crossed. There is also a standard shibari-bondage harness tie, with the arms folded across the back. It's just such a naturally submissive pose. 


Another thing I thought would be beautiful is the model on her side, emphasizing the contrast between the hips and the waist. I wasn't disappointed. It looks really lovely. 

In the image below, you can see the side of the leg pocket more clearly. There is a little room between the lower leg and the thigh, but no where near enough to straighten out. I could see making a shaped pillow to insert between the calf and thigh to make it even more restrictive. This point of view also nicely shows the close fit along the waist and arm pocket. 


Here she is, a little more balled-up...


...and slightly twisting... That mat I shoot on isn't as soft as the bed, unfortunately for her. 


Sometimes, I don't believe the things I make are real. They are so outside of my everyday experience, that even when they're done and photographed they still seem like dream images. This whole set is like that to me. 


Just my lovely fetish dream-girl...


I guess the one good thing for her is this suit isn't nearly as tight, heavy or torturous as the f-suit...


...but of course, that just means I'm already planning on making another, "just slightly" more severe version for us to keep. I always have to keep pushing the envelope. 

Thanks again to my model for putting up with the wraps and posing so beautifully. Thanks to Karen Hsiao for working with me to make these projects real. And thanks to you all for visiting my blog and your continued encouragement and support...

P.S. - to Meguca Meduka let me know when you want to start working on yours!

Friday, January 11, 2013

Poster Number Two for Vanilla Gallery show

Well, I finished up the second piece I'm sending to Japan for the upcoming show at Vanilla Gallery. I managed to take some pictures as well, and put together the little poster shown below. The kneeling restraint is another one of those "I've always wanted to try that" projects, that have been lurking in my mind and sketchbooks for years. I'm so happy to finally have the opportunity to make it happen for real through my collaboration with Karen Hsiao and her Black Cherries series. It's been a great chance to just let my imagination run wild, and follow wherever it goes. No limits. The best kind of project. The show is coming up so soon: February 4th. I have to get this stuff in the mail!

More images and some of the process to come shortly... I'm off to bed. 


Monday, January 7, 2013

Black Cherries F-suit beauty shots

I wanted to share some images from a couple of shoots I did with the F-suit I made for the upcoming show at Vanilla Gallery Tokyo, a project I've been working on with Karen Hsiao - her "Black Cherries" series! 

This F-suit is going over there, and it might be sold - so I wanted to take some nice photos of it just in case I never see it again...

This is probably the most severe, tight-fitting f-suit I've created to date. The legs are positioned so the person inside is pretty much forced into a face-down hogtie. The leg pockets pull the lower leg close, and the torso fits very snug as well. The only relief is in the arm pockets, which are actually the smallest version of the pattern I typically use. The zipped hood also fits pretty close, especially for such heavy, unyielding leather. This is an extreme suit to wear!


You can see from the shot below the tight fit of the torso at the shoulders, and the way the hood and body zippers meet in the middle. This is as close to a glove-tight fit as you are going to get. 


I was hoping you would be able to turn your head inside the suit, but because of the heavy weight of the leather it wasn't really possible. I had to prop my model up on a pillow to allow her to breathe. This design is actually meant to be used in conjunction with a suspension harness, but that part is going to have to wait for another time. For now, the suit can be displayed suspended from the built-in D-rings, just not with someone inside!


I positioned the zipper on the outside of the leg pocket to make getting into the f-suit easier. You step through the pocket, then bend the knee and pull the zip up to get in. I love the way it looks from this angle.


The bean-bag helps get my model off the floor. This is more the position I could see with the suspension harness...


For those of you wondering if there was a real girl in the suit, here's a picture before she got inside:

Looks a lot better with her in it, don't you think?

Saturday, January 5, 2013

F-suit Poster for the Karen Hsiao Vanilla Gallery show

I managed to take some photos and put together a poster for the upcoming show at Vanilla Gallery in Tokyo (see below). It's been so awesome to work with Karen Hsiao on her Black Cherries series, and I'm really looking forward to everyone being able to see the whole set...  It's been a lot of hard work, but very rewarding as well. I wish I could be there for the opening! 


F-suit for Vanilla Gallery - Final Assembly

Final assembly goes like this: Clip the legs in place and sew. 

Those marks indication which seam goes where come in real handy at this point. You are working with pieces turned inside out, and it's very easy to get them mixed up. Align 1 with 1 and 2 with 2. Simple is good. 


Legs complete...


...and looking good. Man, this is going to be one tight fit.


Next for the arms. I align the top panel to the center of the shoulder seam - another thing it's good to mark from the pattern at an earlier stage. 


Arms and legs attached...


Next up is the hood. Aligned on the center seam...

 ...clip the hood in place, and sew like the others. 


With all the limbs and hood attached, it's time to glue and flatten all of those seams. See you in an hour or two...


OK, now we move on to the final seam - the opening from the neck through the crotch. 


This all gets glued down carefully. You want to follow your pattern line and keep these the same length as much as possible, otherwise the zipper will never align correctly. 


With the zipper in place we're almost done... 


I didn't take a picture of this step, but I cut a tongue to run the entire length of the second zipper. This is sewn in place through the opening. 


And we're done!


Another one for the history books...


Now, where'd my fit model run off too? Honey, got a second? I need you to try something on for me...