Showing posts with label workshop. Show all posts

Wednesday, June 7, 2017

Pommel Horse Project

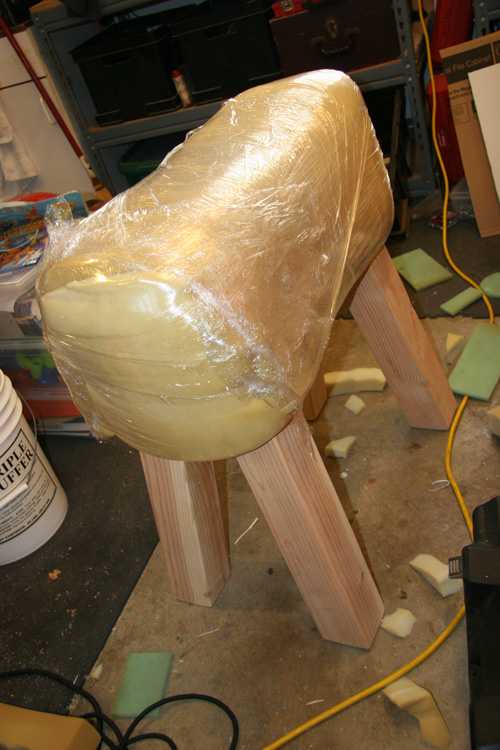
I've been wanting to make a pommel horse for a really long time. I just think they're pretty cool from a sculptural-furniture object standpoint, and of course they offer a myriad of perversion possibilities too… Plus this mostly came together from scrap material - I had a piece of foam sitting around, and a leather remnant that was about the right size. I just needed to purchase the 4x4 lumber for the legs, and it was off to the races. 

As you can see from the photos, the structure isn't based on fine mortise-and-tenon joinery. I used the poor-man's method of wood glue and a shit-load of screws. 
I was fine with that, as everything but the legs gets covered with upholstery anyway. And trust me, this baby is strong and rigid. I toyed with the idea of tapering the legs, but if you see the antique versions (1stDibs usually has a great, if expensive, selection) they typically have straight (un-tapered) legs. 
For the next step, I just laid the foam over the horse and wrapped it in plastic. I cut a couple of pieces from the foam to cap the ends. 

Next up: duct tape. Longtime followers of this blog know that it's my preferred method for generating custom pattern shapes for complex objects. 

A couple of layers on, until everything's nice and smooth. Do you notice the lip on the left side of the image below? I thought I'd try something clever there, and make a space for someone to fit their head between the horse and someone straddling the horse. Didn't really work out, so I'd recommend keeping the sides a cleaner, traditional symmetrical shape. 
Draw potential seam lines out with a marker. 
I was toying with the idea of it wrapping around a bit…

Cut the duct-tape pattern off with scissors. We end up with the main piece…
…and two end-pieces. 
I'm sure at some point I traced the duct-tape pattern onto butcher paper to make the pattern. I usually make the pattern symmetrical and perfect the lines. Then it's transferred to the leather. 
I ended up using darts even though I wanted to keep it as smooth as possible. This is dictated by the shape you want to make and the thickness/stretchy-ness of the leather. 
This leather isn't very stretchy…
Once the end pieces are sewn on and flattened, I pull it over the foam and secure along the edge with upholstery tacks. 
It came out pretty nice, and makes me want to do more furniture-type upholstered and padded stuff. 
Put some stain on the legs, just to give it some color. 
In this shot you can see the ridges in the foam from where it was kept in storage. Over time I expect those to come out… 
And finally at least 3 coats of polyurethane to protect the finish. Sanding with fine grit in between. I've been liking the satin finish lately… Do you think I should add some forged iron rings? 
Hope you liked the project! Stay tuned, more to come…

Wednesday, July 22, 2015

Leather Thickness Conversion Charts

Have you ever needed to convert leather and found it difficult to get from one measurement type to another? You know, from oz. to fractional inches for example? It happens to me all the time (especially when ordering leather online), so I finally put together a couple of conversion charts for the leather thicknesses I use the most. 

Leather suppliers usually describe their leather in oz. thickness, but the way I measure leather in the workshop is with a pair of digital calipers (which gives me the thickness in mm). These charts allow me to figure out right away that a 2.5 ounce leather will be about 1mm thick. 

There are 2 versions of the chart: one with bands marking the oz. lines, one with bands highlighting the mm. These only cover leather from 1 to 4 mm thick - that's everything from a very lightweight lamb (0.7mm) or pig leather to a very thick bullhide (3.5-4oz.). Of course, many vegetable-tanned leathers can be thicker than 4mm, but I decided to leave that for another chart. Think of these as more for light, medium and heavy-weight garment or chrome-tanned hides that can be sewn with a typical industrial leather sewing machine. 


 PDFs of the mm chart can be downloaded here, the oz chart here. I hope you find them useful!


Thursday, May 8, 2014

Ballet Boot Deconstruction - Part I

I want to know how these ballet boots are built, and what better way than taking them apart? 
Fortunately, I have a pair of ballet boots that developed a problem with the heel that I don't mind destroying. The vinyl clouded over and tuned white on the heel, and started flaking off near the seams. In trying to fix it, I ended up melting the PVC material with my heat gun (hey now! Not that one, silly.), so I consider these boots expendable, in the name of scientific inquiry. 
These boots, although made of cheap materials in China, have a really nice shape. I particularly like the toe box, and they seemed to fit quite well, both on the foot and calf (before they fell apart, that is). 
These are made by "Devious" and retail on Amazon for around $150 US. I can see similar styles available currently under the "Pleaser" brand name. 
The entire boot is lined in a kind of synthetic nylon material. 
The first part to come off of the boot: the insole. 
About 1/8" thick dense foam with cloth on one side, and an embroidered label sewn in with red thread. 
I start to peel the sole from the bottom of the boot: it seems to be just held in place with glue. 
I can see some phillips screw heads inside the shoe once the insole is removed. 
After the 2 screws are removed (they're about 1" long), the other thing holding the heel in place are some sharp ends of a 4-prong staple and some glue. 

So now we have the heel:
It seems to be a steel shank or rod embedded in a kind of cast resin or plastic. 
For this size 6 (or 36 European sizing), the heel measures 7". 
There is a groove in the inside of the heel which runs through both the metal and plastic/resin part. This groove creates a void into which the leather can be tucked when the heel is wrapped. 
The end of the heel has a little rubber cap on the end of a metal shaft...
...which fits into a hole bored into the end of the heel. 
You can see where the glue pulled the vinyl apart (or left some of the vinyl from the heel behind): 
Here's the staple (a couple of prongs broke off as I pulled it out). 
Now I can peel the outsole away from the upper. 

The outsole is a hard plastic, about 1/8" thick. Lots of glue residue, the only thing that was holding it in place. 
Now we have the bottom of the boot with the sole removed. You can see evidence of tapering of the vinyl where it meets the bottom of the boot. 
Surprisingly, there is some fiberous material, similar to the kind of reinforcement you find in duct-tape. 
At this point, I can pry out the part of the boot that forms the sole. 
It is a sandwich of 3 layers, as far as I can tell, molded and held in shape with some sort of adhesive. You can see the graceful S-curve which follows the contour of the sole, from the heel and around the ball of the foot to the toe. 
You can see this piece is shaped in both directions: horizontally and vertically. 
Note the rivets which hold the shank in place, one at around the middle of the foot...
...and one at the heel. It sits right in the middle of the staple which ran into the heel. 
This structure is composed of 3 layers: the 2 outer layers a kind of dense fiberboard, the inner central layer of what I've seen called bondtex or bag stiffener. 
These shapes are all held in place by what seems like some kind of glue. 
Notice how the fiber board is tapered as it meets the central layer. 
It has a pretty pronounced shape, and has a lot of structure on its own. 
The bottom layer seems to be tapered as it approaches the toe as well. 

I begin to pry the top layer from the middle layer. 
This reveals the steel shank, a structural element that helps give the shoe its shape, and allows it to both flex, and spring back to its original form. 
The shank in this boot measures right around 4.375 inches. 
One curious detail: the metal part reinforcing the top of the shank seems to be cut from some pre-printed piece of metal (possible Chinese recycling in action?)...
Our now heel-less and sole-less boot...
The fiber is still intact. 
It's hard to say whether this fiber was attached to the inner sole parts, or stood alone somehow during the construction of the shoe. 
There is some kind of writing you can make out on the fiber tape, which didn't transfer to the insole. Possibly evidence that this fiber stood on its own at some point during assembly. 
Next part to come out: this piece of fibrous material that creates the shape of the toe box. 
It fits in between the lining and the outer patent layer of the upper. This is definitely the part that gives the toebox its shape. 
At this stage in the deconstruction, I'm a bit stuck. Usually it's easy to tell what comes next based on the stitches...
...but it seems the toe box should come away completely. Kind of strange, as I assumed the entire outer part of the boot would be made independent of the inner lining. This suggests that the toe and upper part of the boot were sub assembled, then joined, making a weird seam (look how the vinyl outer material wraps around the zipper). 
That leaves us with the upper, which has the tongue integrated. 
It's the next seam to come apart: the one holding the tongue in place.
Once that seam is removed, we have the tongue and two separate upper parts. 

The tongue itself has a few details to take note of:
Only the top four inches or so are edge-finished. The rest are rough. 
The edge-stitching is insanely close to the edge. It seems like 1/16" or less! 

Once pried apart, the tongue yields 3 layers: outer vinyl, cloth inner layer (glued to outer layer), and the same inner synthetic lining found throughout the rest of the boot. 
I'm done deconstructing for now, it's time for dinner...