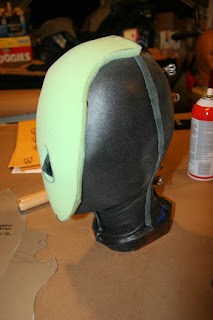
In this post I'm going to take you through my process for making a foam-padded hood. This is actually two leather hoods: one inside the other with a foam layer in between. The foam provides both an overall tightness, and adds to the sensory-deprivation of the poor victim/lucky slave trapped inside. Also, it looks really cool! Let's get started.
I begin with my foam pattern parts, cut out from the same pattern I use for the outer hood. It's about 1" thick, cut out with scissors.
There's an offset pattern for this project, as this hood is going to attach to a butterfly straitjacket which will have both a zipper and lacing closure. There is about a 1 inch allowance for the lacing strip. More on that later...
I layout my parts on the outer leather, which is a 1.2mm thick soft cow hide.
Here you see all the parts for the outer layer. Kind'a forms a funny-looking face.
For the inner hood, I'm using the classic four-panel pattern that can be found here, made in a soft lamb leather (about 0.7mm thick). I'll only use the front and rear panels (no tongue parts) as the tongue will be created for the entire jacket, not just the hood. More on that later too...
The weirdest thing about this inner hood is I'm going to build it inside out. I would normally have the seam on the inside of the hood. But since I don't want the seam to press on my slave's pretty little face, I'm going to make the seam on the outside of the hood.
This isn't usually possible, as it would look kind of funny to have the seam on the outside.
But since the "outside" of this hood is going to be hidden by a layer of foam (and the outer hood), it's the best way to go. I had to really be careful, because I'm so used to the suede side of the workpiece being the one facing out during sewing. All the marks for the pattern were traced on the "good" shiny side of the leather as well.
So here I'm done with sewing the inner hood together.
With the funny seam allowance sticking out all over...
But it's nice and smooth on the inside. She's going to love it!
I decide to trim the seam allowance to a bit more than 1/8".
I put it on the hood form.
And from here I can brush on some glue along the seams.
I gently pry the seams apart (a stitch ripper helps)...
...and flatten the seam all along its length.
And here she is all smoothed out.
It should feel nice and smooth on the inside.
Now for the foam parts. These get hit with a generous coat of spray-adhesive.
I decided to spray the inner leather hood as well: I don't want anything moving around once the foam is in place.
Plus, it has to stand up to the (pretty tight) outer leather hood being pulled over it. There's a lot of friction between the foam and the leather, so don't skimp on the adhesive.
I start with the face piece. This has a center alignment mark from the pattern, which helps make sure it's in the right place.
Next, I add in the side panels, being sure to tuck the edges in so the surface is nice and smooth.
There's also a dart in the back of the side panels to help it create the cup or bowl-shape of the base of the skull.
Coax the foam around, and you can make the seam and dart pretty much go away.
It takes some trimming, but the rear foam panels are positioned last.
We have a good-looking foam-covered hood at this point. Every thing tucked in, and seamless, ready for the outer heavy leather cover.
This is the trickiest part of the whole operation: get the tight outer hood over the foam without pulling anything out of place. It's a really tight fit, so I'm glad I used all that spray glue.
Once it's all tugged and pulled into position, I'm pretty happy with the way it is looking. That smooth curved contour is really nice and sculptural, and the contrast between the big head and tiny neck is really sexy.
Can't wait to see it on.
That's it for now... Next time: closing the back, and adding it to the jacket.


i have so many questions, mostly in the guise that if i were to try to make this at home, how would i fix X.
ReplyDeleteok, i guess, reading again, i just have the two questions:
the seam ripper never actually ripped seams, right? i just spread the two bits apart?
you used magic to make the foam not move, right? that seems like it'd be super wobbly.
third question: is that super perfect hood, or just regular perfect? it looks super perfect, but it's hard to see.
i continue to love all your work!
:)
Hey sammy,
Deleteexactly on the seam ripper: it's just to pry those 2 pieces apart. The glue wants to make the soft lamb stick together, so otherwise it's a bitch!
The foam was really held in place by the spray mount. The Super 77 is pretty strong stuff, and I sprayed both the foam and the inner hood.
Re: perfect or super perfect. I always say it takes making something about 50 times before I get really good at it. So any kind of perfect is pretty far away at this point. But, this one is really cool-looking (especially on my little slave girl).
Thanks for the ongoing support, sammy!
=0)
It's really impressive... I LOVE IT
ReplyDeleteKiss