Showing posts with label tools and equipment. Show all posts

Tuesday, January 6, 2015

Leatherworking Tool List

For those of you who have asked about the tools I use most often, I put together the following list. It covers about 95% of what I need to do most leather sewing projects...


Sunday, October 5, 2014

Making Leather-Covered Buttons

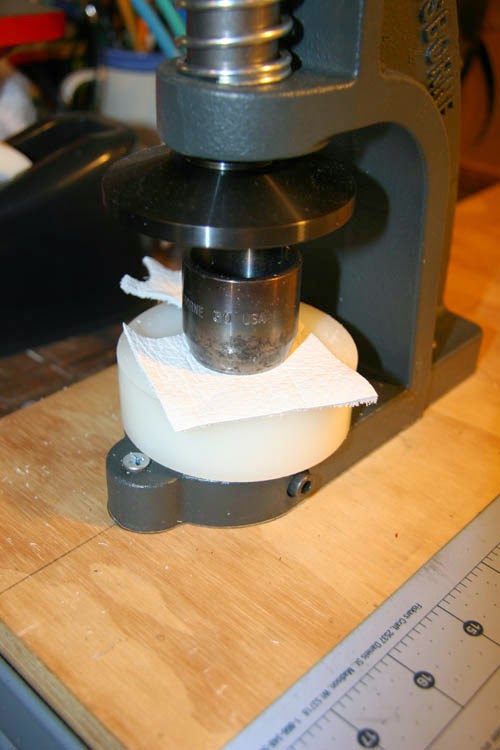
So I got a new toy in the workshop recently: an Osborne button-making press. It all started when I volunteered to make a friend of mine a tufted leather headboard for her king-sized bed. Of course we needed matching leather-covered buttons, right? How hard could it be? 

My new toy!
 Turns out the Osborne W-1 Hand Button Machine press is very heavy-duty, and a lot larger than I thought it would be. It seems to be made for serious production work. The long handle gives you plenty of leverage, and you will definitely need to bolt this machine down to the workbench. 
A close-up of the business end.  
You have to order the proper die-set along with the machine to match the size of the buttons you want to make. I got the #30 which is for a 3/4" button, along with the blanks for the wire-back buttons, and the nylon tufting twine - each is sold separately. 


The die set consists of a cutter, a top and bottom die, an allen wrench, dowel and nylon cutting block. 
 The bottom die is a spring-loaded contraption which will take the wire-back part of the button. 
 There's a hole in the middle to accept the wire protruding from the back.
 The top die takes the leather blank and the part that becomes the front of the button. 
 It slides back and forth sort of like a piston. 


 The cutter is a nice beefy cookie-cutter type of circle punch. 
 Used with the nylon block, it should easily punch oodles of perfectly-sized leather circles. 
 To begin, place the nylon block in the press. 
 Place your leather on top of the nylon block with the cutter on top of that, roughly centered under the top plate. 
 Apply some pressure to the handle and you get a satisfying "chunk" as the circle cutter slices through the leather. 
 At this point, I'm going to pull out the skive to shave the leather down a bit, thickness-wise. I tried to make a button with the full-thickness leather, but it was a no-go. I think the whole machine is set up for thinner upholstery cloth-covered buttons, so it takes some fine-tuning to make the leather work with these buttons and dies. 
 In case you don't know: the skife is a razor blade knife where there is a slight curve to the cutting edge. This is perfect for shaving down the thickness of a piece of leather in a controlled manner.  
 I work on a piece of glass, because every other work surface I have would otherwise be damaged by the knife. 
 We're starting with a 1.07mm thickness on the leather. 
 After shaving the backside down carefully...
 ...I end up at .68mm thick. It makes all the difference in the world. 
 We're ready to grab our button blanks. One for the front, and one for the back. 
 Take the top die.
 Place the leather blank face-down into the die. 
 Take your blank button front.
 Place it face-down in the center of the top die, and push it into the hole. 
 Use the dowel to push the button front and leather all the way down. 

 You should be able to see leather all around the button face.
 Now take the bottom die. 
 Load it into the machine (you can secure it with the allen wrench set screw). 
 Place the wire-back of the button into the bottom die. 
 The wire should be facing down.
 Take the loaded top die...
 ...and place it on top of the bottom die. 
 Pull the handle down, and you should get this: 
 At least that's what I got at first: a messed-up button. See the cut along the edge? Too much pressure. 
 I found it handy to use a little screwdriver to remove the finished button from the die. 
 Try again, and with a bit less pressure you can get the button to turn out okay (without the cut through part). 

 When they turn out right, the leather tightly wraps around to the back, and the whole thing is held in place through crimping and pressure. It's almost magic. 
 I probably messed up one button for every two that turned out, but I'm sure with practice I could do even better. I'd recommend giving yourself time and extra leather to get the formula down pat. 

 I went ahead and got the tufting twine, as I didn't think any of the threads I have could handle the extreme tension these buttons will place on it. 
 I used a heavy-duty needle to thread the buttons through the sewn seams. 
 I put both ends of the thread through the eye of the needle. 
 I found I didn't need a pilot hole, I just put the needle in the center of the seam and pulled it through to the backside. 

 Given a decent tug, the thread and wire back nestled between the stitches and sat nicely in place. Check back later, and I'll show you how the finished project turned out. 

Wednesday, November 7, 2012

A Tour of the Workshop

I have some people who contact me about the equipment I use, so I wanted to do a couple of posts about my workshop and equipment. I am lucky enough to have a dedicated space to work. For years I just worked in the living room of an apartment, which meant everything had to be taken out and put away every time I used it. It's much better now that I have a place to get messy and creative, and not in the middle of the living room. I'm sure my wife agrees... right honey?
Here's my workshop on a typical Saturday morning. I've got great natural light coming in through the window, and lots of places to lay out patterns and leather. This is my happy place. 
The studio is divided into three areas: layout, sewing and pounding (I'll explain that last one in a minute...). 
You can see from the diagram below, it's similar to a kitchen layout, with a work triangle formed by the three most commonly performed tasks. With my projects it usually goes: cut, sew, pound - repeat. The leather is laid out and the pattern traced on the main table. The pieces are cut out and clipped together for sewing. Then, the seams are glued and flattened with a mallet (pounded), before moving on to the next part. 
Most of my sewing is done on my workhorse: an Artisan 1797-AB leather sewing machine. It's a compound-feed walking foot machine with reverse-stitching capability and a beefy servo motor. I can do slow, careful work with it, and it can handle light to medium-weight leather. I absolutely love this machine!!
 The other machine in the shop is a 2618-1B, a heavier cylinder-bed machine also from Artisan. I call her "The Beast". It allows me to sew inside closed-end shapes like bags or hoods, and also to handle topstitching where the arm of a sleeve attaches to the body. I have been struggling with the machine because it has a tendency to break needles, but hopefully the latest service I had performed will fix the problem. With any new machine it is hard to tell if the machine itself is the problem, or if it's just because I don't know how to use it yet (which is entirely possible). I may have been spoiled by the ease-of-use of my other Artisan machine... This machine has an even more powerful motor that would easily sew through your finger. I definitely treat her with respect!
 This is an area I call the pounding station. I have a heavy granite plate that I use as a surface to pound flat seams. It also sits under the tooling pad I have when using punches to provide a solid, stable surface. Also, there's a nice little area to cut pattens and parts if needed. To the right of the granite block is my Weaver "Little Wonder" rivet-setting machine, bolted to the workbench. 
 I end up using the space between the rafters for leather storage, in rolls and tubes. Also, paper for design layouts and pattern making. 

 
My main work surface is a 48 by 36 inch table I made with wheels so it could be moved around. This is supplemented by an extension on sawhorses to take the whole width of the work surface to 96" or 8-feet wide. When working with a full hide or a side, you need that much space to lay it out flat. I also use a separate 18" by 96" piece of plywood to extend the surface area if needed. Even with the extension (a full 54 by 96-inch table top), a 55 square-foot full hide will overlap the work surface a bit on the sides.
Under my wheeled table I have room for storage, which is where the thread and leather dyes live. 

 I have quite a few large patterns, which get stored in another cabinet I made. 
 My table saw gets pressed into service as a leather holding area. (It's under the pile...)
 I keep my smaller pattens in 10x13 envelopes, dated and labeled...
...and these go in a drawer inside the cabinet as well.
That's about it for the studio tour today. Thanks for visiting... Coming up next time: Tools!