 |
| The armbinder pictured above is made directly from the free pattern. |
Today I'm going to take you through the making of an armbinder using the pattern I posted a couple of days ago. The downloadable pattern can be found here.
This pattern has all the pieces you'll need to build the armbinder, including all the fussy little bits: reinforcements, keeper loops and even a couple of templates to help you position your holes correctly. Just print it out at 100% (you'll probably have to tile the pieces together like I did), make any necessary adjustments, and you are ready to go.
I am actually making 3 armbinders at once, so don't be confused. I'm making one straight from the pattern, and 2 modified versions: slightly tighter and with tweaks to the size of the hand pocket. Your first step should be to make any necessary edits to the size of the pattern before you begin so it fits you (or your lucky slave).
The good news is all the little elements should remain the same size, even with different fit options for the sleeve itself. The one exception is the long straps. For anyone over 5'2" tall, you may need to make the straps a bit longer than the 29 inches called for in the pattern. I would always recommend making a test of the pattern before cutting leather. You can use vinyl or some people use denim or muslin. Better to find out on something cheap, rather than the expensive, beautiful hide you just (almost) wasted!
Step 1: Cut out all your parts. Below you can see the three sets of small parts cut out: one for each armbinder I'm making.
Step two is to clip and sew along the first 4" of the hand pocket.
You don't want to stitch too far: on one side you need the opening for the laces, on the other we'll be inserting the D-ring. Start and stop at the marks indicated on the pattern.
Step 2: Glue in the reinforcement tabs (#5 on the pattern).
Cut reliefs, glue and fold down hand pocket stitching and along laced opening.
Use mallet to flatten.
Keep the transition from stitched to non-stitched part smooth.
Topstitch along laced opening 1/8" from edge.
Glue, flatten and topstitch top edge of tongue.
(The folded edge on the tongue could be optional, but I think it looks neater that way.)
Use double-sided tape along the edge to hold the tongue in position while sewing.
Peel off the backing and place the tongue in position:
I usually turn the piece over, and check for symmetry. Adjustments can be made at this point, to make sure it's just right before sewing.
Now topstitch with a 1/2" gap for the lacing grommets (a stitching guide can come in handy here).
After sewing, remove double-sided tape and trim excess from tongue.
Now it's time to glue up all your straps.
I find it handy to use a 2" disposable brush to spread the glue on the strips.
Wait for the glue to set up (about 5 minutes)...
...then fold all of your strips to create your straps.
You could always use vegetable-tanned leather belts, or whatever else you like for your straps. I tend to like having the straps and keeper loops all made from the same hide so the color and texture matches perfectly. Plus, straps made like this are soft and slightly stretchy, which makes the armbinder feel a bit more comfortable when you are wearing it.
You can also glue up the straps for the D-ring.
I reinforce these with strips of nylon webbing.
These get glued together, ready for sewing into the end of the hand pocket.
You insert the D-ring facing in...
...then fold the pocket up...
...and clip together for sewing. Not shown: I usually trim off that bit of tab extending beyond the edge of the seam allowance, so a binder clip can hold the D-ring in place.
Now, sew up the rear seam of the armbinder.
Run an additional line or two of stitches to reinforce the D-ring connection.
Now cut reliefs, glue up and flatten the rear seam.
Glue in the tabs for the rear-seam reinforcement (#9 on the pattern).
Here are the reinforcement tabs:
Glued in position:
Time to finish the belts. Trim to length, using a 1" rounded strap-end punch.
Each long strap (pattern #3) gets paired with a long strap reinforcement (pattern #6).
Sew these in place.
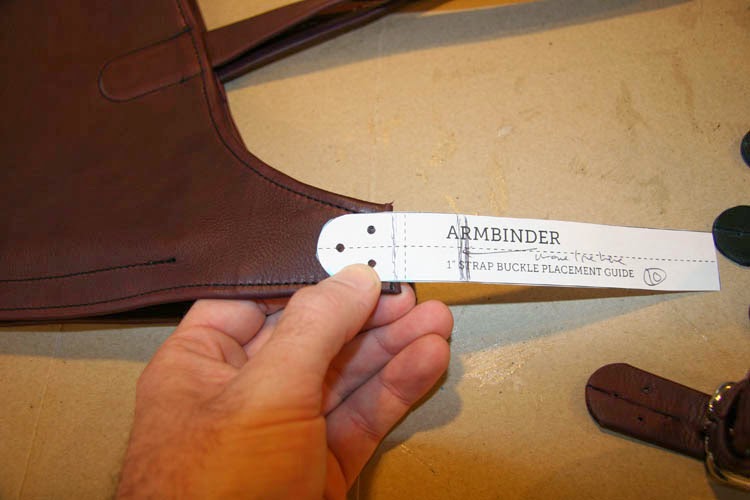
Time to work on the buckle-end straps (pattern #4). I put a little template into the pattern (#11) to help you position the holes correctly on these straps.
Use a 1" strap end punch to round the corners and cut the straps to length.
Use a .625" slot cutter (also called an oblong punch or bag punch) for the slots.
And a 1/8" hole punch comes in handy for the pilot holes to attach the buckles with rivets.
Next we fold down the seam along the top edge of the armbinder.
Cut away the corners from the seam allowance.
Cut reliefs in the curved seam allowance to allow it to lay flat, and fold it over.
Last, fold down the top tab.
Now you have the top edge folded down. But before we topstitch, we're going to sew the long straps in first.
I use the double-sided tape to hold the long straps in position.
Align with the marks from the pattern.
Now topstitch the long-strap tab in place, following the D-shaped contour of the strap. Finally, topstitch along the top edge (and across the strap).
It should look like this when you're done:
An inside view:
The stitching should come around and meet up with the lacing opening stitches we did earlier.
Now it's time to work on the buckles. First, cut the keeper loops to size. For this thickness of leather (1.3mm), 3.125 inches long is just about right.
I use a staple gun to close the loops.
Wrap 'em around the wood wedge.
Staple them across the gap.
Then pry them off, and turn down the prongs to hold the loop closed.
We have all the buckle-end parts ready to go: straps, buckles and keepers.
Use the template to mark and punch pilot holes in the armbinder tab.
I use short nails to keep the belt in position on the tab while I set the rivets to hold it in place.
The buckle straddles the tab (one leg on either side).
I use the "little wonder" riveter from Weaver to set the 5/16" cap rivets.

You could use jiffy rivets, or even sew this connection if you don't have the tools to set rivets. Just punch 4 holes and used waxed thread.
Use the pattern to mark the location of the grommet holes.
I punch 3/16" holes to fit the size #00 Osborne grommets.
Once the rivets are set, time to lace her up. It takes about 92 inches of lacing.
I like making the X pattern with the laces.
And that brings us to the end... Congratulations on your new armbinder(s)!
Once again, the pattern is here if you want to give it a try... Good luck!


Love the technical stuff.
ReplyDeleteWhat weight leather would be suggested for this project?
ReplyDeleteTried it with some 1oz leather, but seems much too thin and stretchy for bearing weight and supporting the rivets.
Dear Laughing Man,
DeleteAccording the the chart I found 1oz would only be about 0.4mm thick, which is very thin. I use a lamb tan cow (called "Lamba" from Sav-Mor Leather in LA) that is about 1.2mm thick. Still soft because of the tannage, but thicker and stronger.
What weight of leather is suggested for this project?
ReplyDeleteTried 1oz leather but seems much too thin for the stress and rivets.
Beautiful work, would you be willing to sell one?
ReplyDeleteThanks, but I'm not taking orders for custom work at this time.
DeleteHello Christopher,
ReplyDeletegreat job as always. I have got question - do you have more patterns of items on your blog? There is just a few patterns, but many items. I am trying to create some items:)
Actually i would buy some if necesary.
Regards
Thanks marek! The easiest way to locate the patterns is by clicking on the "patterns" label in the tag cloud (located just above the "popular post" listing on the right side of the page). I have not created patterns to share for every single item I blog about. Some are works in progress, and others are difficult to digitize (like the sleepsacks). But I have posted patterns for male and female hoods, booties, posture collar, armbinder and butterfly straitjackets.
DeleteHow much and what kind of leather did you use for these?
ReplyDelete1.2mm thick lamb-tan cowhide or aniline cow (the burgundy color shown above) are the leathers I prefer for these armbinders. You could possibly make 2 out of a single 22 square foot side, depending on the size.
DeleteHi Unknown,
ReplyDeleteYou could hand stitch, but speaking from experience, it's a lot of work. Even this relatively thin (1.2mm) leather is extremely tough to push a needle through. Much of the hand-stitching you see with leather is veg-tan, which would be pre-punched (with a pricking iron) and then stitched with a waxed linen thread. It's also possible, and would give a more rustic, hand-made look.
why is this a female armbinder? I like them too :)
ReplyDeleteHi Bernhard! This pattern is based on female measurements, which tend to be a bit smaller than male measurements (just a generalization, no offense)! You could definitely make adjustments in the pattern to fit any size, and I'm in agreement: armbinders are great fun for both (all?) genders.
DeleteHi Christopher, thanks a lot for the pattern and the instructions. I take your pattern as a template and am currently wondering if your pattern was meant to made the elbows touch. In my adjustment I need to make the measurement on elbow heights much smaller to make the elbows touch. Can you confirm my assumption that your pattern didn't mean to make the elbows touch?
ReplyDeleteKind Regards
Frank
Hi Frank,
DeleteThe free pattern I've shared doesn't make the elbows come together completely, but they get close… probably about an inch or two apart. Your assumption is correct! Typically there's a trade-off between tightness and how long someone can stay in the armbinder. Although I do love seeing elbows welded together (I'm thinking of Mina from Restricted Senses, and a beautiful shot by KevinInRI on FetLife), not everyone is that flexible.