 If you've followed this blog for a while you may recognize this from past posts where I discussed the prototype: the square armbinder. I built it this past weekend, as a companion piece to the hood in the last post. The process of developing the pattern for this was pretty tricky, as there are just 6 main pieces, and adjustments to one part of the pattern had a way of rippling through the other pieces. Each time I adjusted a line or shape, it would affect things like the alignment of the darts, or the fit of the neck opening, which have to be tweaked to end up just right.
Here is my final master pattern, developed as a result of the six prototypes I made in vinyl and leather. For the working pattern, I want to make room for the lacing panel which will allow the fit to be tightened or loosened as needed.
If you've followed this blog for a while you may recognize this from past posts where I discussed the prototype: the square armbinder. I built it this past weekend, as a companion piece to the hood in the last post. The process of developing the pattern for this was pretty tricky, as there are just 6 main pieces, and adjustments to one part of the pattern had a way of rippling through the other pieces. Each time I adjusted a line or shape, it would affect things like the alignment of the darts, or the fit of the neck opening, which have to be tweaked to end up just right.
Here is my final master pattern, developed as a result of the six prototypes I made in vinyl and leather. For the working pattern, I want to make room for the lacing panel which will allow the fit to be tightened or loosened as needed.
 The pieces that were cut out have been joined together to make the pattern for the tongue that will go behind the laces. Part of the challenge (or fun, depending on how you look at it) is figuring out how you are going to put the thing together. I'll talk more about that later, but below you can see the working pattern ready to go. You have the main panels for the front and back, along with the pattern pieces for the bottom of the arm pocket and collar which have been split to accommodate the lacing panel.
 I start by tracing out the pattern pieces on the leather.
 Before I can cut the piece for the tongue, I need to add a total of 1.25 inches all around. This is to accommodate the grommets and to give me a margin for sewing. The tongue will be topstitched blind into place, and I want plenty of room.
 Here's the pattern for the tongue, extended all around.
 Here are all the pieces cut out (sorry about the lack of focus)! 2 front panels, 2 rear panels, collar and bottom of pocket in 2 parts, and finally our tongue.
 The first step is to sew all the darts on the front and rear panels.
 Darts sewn:

 Darts glued and flattened:
 Next, I'll sew on the bottoms of the arm pocket.

 Glue and flatten the seam.

 Next, we sew the front panels to the rear panels.
 And glue and flatten those as well...
 Now for the collar pieces, which get the same treatment.
 It's starting to look like something... I haven't joined the left and right sides together yet, as I was thinking it would be easier to sew the tongue in if they weren't.

 At this stage I am ready to fold over and glue all the seam allowances, except for the little tab will join them together.
 Here the seams are turned and flattened, ready for the tongue. I know, that sounds strange, right?
 So, since I built in the 1.25 inch margin on the tongue, I'll mark in 1.25 inches from the edge of the laced opening so I have a guide when placing the tongue. As long as I align with the marks we should be in good shape.
 I kind of skipped ahead here to having the whole tongue sewn in. I also sewed the two halves together at that little tab. It went pretty well, I must say - and here is what it looks like inside-out.
 Now right-side out:
 And the view from the rear:
 Now we're at the step where I'll put the turned edge on the collar and the arm opening. For this I cut strips to length a couple of inches longer than the edge, and 1.75 inches wide.
 These get clipped into place,
 sewn,
sewn,
 and glued and rolled into place.
 Now it's on to the collar and tongue...
 And that completes the major sewing operations for this piece. It really looks like something at this point.
 I now just mark the spacing for the grommets, punch the holes and set the grommets. Thread the lacing, and it is one done armbinder!
 Here's the view of the backside:
 And the front, complete!
 This has been a really cool project, and I can't wait to see it on. If I did my job right, it should fit like a glove. Maybe the client will send a picture when he receives the item? There's always hope, right? Take care, and thanks for stopping by!
 I just finished a cool hood with a unique feature - a locking collar. I love the simple lines and severity of a nose-hole-only hood. It is just a classic, timeless fetish look. I used the basic hood pattern for this project that I have made available here on my Deviant Art page.
  I created a strap from the same leather I used for the hood, so the texture and color is a perfect match. I cut slots with the slot cutter for the hasp to fit through.
  You just need a willing slave and a small padlock, (or maybe not-so-small), and you're ready to go.
 I shoot these pictures with the hood on a manequin head, but the real beauty of this piece will be once it's laced on to it's slave. The form of the facial features will show through, and eventually the leather will conform to the wearer's face more and more. It will just get better with age and use.
  I think hoods are great for their ability to really change your sensory perception and connection to outside reality. The head is the seat of the five senses, and hoods play with them all: sight, sound, touch, taste, smell... Well, I guess it's not easy to taste in there, but for all the rest - it can be an intense place to be.
 It's the ultimate form of surrender, in gleaming black leather.
I completed an armbinder over the weekend that is a little different from the one I blogged about a couple of weeks ago. It is also made of black patent leather, and closes with a zipper. But on this design, where the strap meets the body of the armbinder in the rear, there is a curved form - which creates a more fluid transition between the strap and the body. Also, this design integrates loops to hold 2 straps in place - one at the elbows, and one at the wrist.
First I start off by laying out the main pattern pieces.
 You can see I made marks for the placement of the belt loops. I punched little holes in the pattern to make sure they will be symmetrical on both sides.
 The first sewing operation is just a the short seam between the bottom of the zipper and the tip of the hand pocket.
 That's roughly the part between the two clips in this picture:
 Once that's sewn, I'm ready to start the first glue-up. I am going to glue down the seam allowance for the zipper, and that small section of the hand pocket.
 Since the glue is out, I'll also take the opportunity to glue in the reinforcement pieces for the belt loops.
 I used the little tabs to mark the area that needed glue, then I glued 'em all up:
 Here we have the tabs glued into place and the seams flattened.
 I love how the hand pocket already starts to take shape, even with that little bit sewn together.
 Next up: we'll sew in the zipper. I'll hold it in place with tape...
 Sew one side...
 ...and the other.
 At this point, I cut out the tongue (about 2.5 by 19 inches).
 And sew that into place.
 Now I'm ready to close the back seam of the armbinder. But first, I want to place a small d-ring at the tip. I find a scrap of thicker leather, and make a small tab to hold the d-ring in place.
 This is inserted into the armbinder at the tip of the fingers, with the ring INSIDE. Held in place with a bulldog clip.
 Once the seam is sewn it looks like this: very pretty!
 Now I'll glue and flatten the seam allowance for the rest of the armbinder's body.
 Once those seams are flattened, I topstitch along the top open edge. At this point, the major work on the body is complete!
 A closeup of the hand pocket with d-ring.
 Next up, we have the straps. Since this is for a rather tall girl, we will be doing some pretty long straps. The 1" wide shoulder straps ended up being over 41 inches long. The 2 smaller straps are for the elbows and shoulders, and will measure 3/4 inches wide when complete.
 This is the usual for self-made straps: glue up, fold over, pound flat. I like making straps for a few reasons. They will match the piece exactly, and unlike veg-tanned leather they will stretch a bit more. I think the "give" makes them a bit more comfortable.
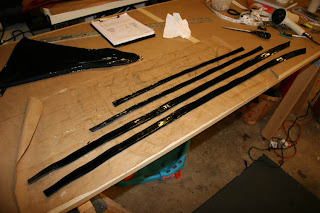 Here's the final roll of straps. I've run a line of stitching along both edges, to provide additional reinforcement.
 After attaching the buckles. See the last armbinder post for that process in more detail.
 The belts in patent look so great...
 OK, next up is to mount the belt loops onto the armbinder. I want to mark the location for the holes on my little tabs. When these are mounted I want them to lay pretty flat, but with a little gap for the belt to fit through. I don't want the loop to pull the armbinder and create a pucker.
So I created a little template to help me mark the proper spacing on the tabs, and on the binder. Since the pen I'm marking with won't show up on the patent leather, I ended up placing tape on the surface. CAUTION: this trick won't work on all types of leather. You may end up pulling off the surface finish which can ruin your project. Test a scrap if you aren't sure - learn from my painful experience!
Marking the loops:
OK, next up is to mount the belt loops onto the armbinder. I want to mark the location for the holes on my little tabs. When these are mounted I want them to lay pretty flat, but with a little gap for the belt to fit through. I don't want the loop to pull the armbinder and create a pucker.
So I created a little template to help me mark the proper spacing on the tabs, and on the binder. Since the pen I'm marking with won't show up on the patent leather, I ended up placing tape on the surface. CAUTION: this trick won't work on all types of leather. You may end up pulling off the surface finish which can ruin your project. Test a scrap if you aren't sure - learn from my painful experience!
Marking the loops:
 Marking the armbinder:
 Ready to punch and rivet in place:

 Here's a closeup of the wrist strap loop:
 And the one at the elbows:
 A perfect fit!
 I also attached the straps using a combination of sewing and rivets. Check with the other armbinder blog post for more detail on this operation...
 That's about it for this project... It looks so great, and I can't wait to see it on.
 Hopefully you guys are enjoying the blog, and getting something out of it. For someone like me there is always a thrill in seeing a project go from idea to finished piece. I hope to post the pattern for this project in the near future. Until next time...

 If you've followed this blog for a while you may recognize this from past posts where I discussed the prototype: the square armbinder. I built it this past weekend, as a companion piece to the hood in the last post. The process of developing the pattern for this was pretty tricky, as there are just 6 main pieces, and adjustments to one part of the pattern had a way of rippling through the other pieces. Each time I adjusted a line or shape, it would affect things like the alignment of the darts, or the fit of the neck opening, which have to be tweaked to end up just right.
  The pieces that were cut out have been joined together to make the pattern for the tongue that will go behind the laces. Part of the challenge (or fun, depending on how you look at it) is figuring out how you are going to put the thing together. I'll talk more about that later, but below you can see the working pattern ready to go. You have the main panels for the front and back, along with the pattern pieces for the bottom of the arm pocket and collar which have been split to accommodate the lacing panel.
 I start by tracing out the pattern pieces on the leather.
  Before I can cut the piece for the tongue, I need to add a total of 1.25 inches all around. This is to accommodate the grommets and to give me a margin for sewing. The tongue will be topstitched blind into place, and I want plenty of room.
 Here's the pattern for the tongue, extended all around.
 The first step is to sew all the darts on the front and rear panels.
 Darts sewn:
 Darts glued and flattened:
 Next, I'll sew on the bottoms of the arm pocket.
 Glue and flatten the seam.
 Next, we sew the front panels to the rear panels.
 And glue and flatten those as well...
 Now for the collar pieces, which get the same treatment.
 It's starting to look like something... I haven't joined the left and right sides together yet, as I was thinking it would be easier to sew the tongue in if they weren't.
 At this stage I am ready to fold over and glue all the seam allowances, except for the little tab will join them together.
 Here the seams are turned and flattened, ready for the tongue. I know, that sounds strange, right?
 So, since I built in the 1.25 inch margin on the tongue, I'll mark in 1.25 inches from the edge of the laced opening so I have a guide when placing the tongue. As long as I align with the marks we should be in good shape.
 I kind of skipped ahead here to having the whole tongue sewn in. I also sewed the two halves together at that little tab. It went pretty well, I must say - and here is what it looks like inside-out.
 Now right-side out:
 And the view from the rear:
 Now we're at the step where I'll put the turned edge on the collar and the arm opening. For this I cut strips to length a couple of inches longer than the edge, and 1.75 inches wide.
 These get clipped into place,
  sewn,
sewn, and glued and rolled into place.
  Now it's on to the collar and tongue...
 And that completes the major sewing operations for this piece. It really looks like something at this point.
 I now just mark the spacing for the grommets, punch the holes and set the grommets. Thread the lacing, and it is one done armbinder!
 Here's the view of the backside:
 And the front, complete!
 This has been a really cool project, and I can't wait to see it on. If I did my job right, it should fit like a glove. Maybe the client will send a picture when he receives the item? There's always hope, right? Take care, and thanks for stopping by!


