I recently started on a project I have wanted to do for a long time: a pair of custom-fit ballet boots. They're based loosely on a drawing I did a long time ago of a pair of boots that had a sort of closed-ring shape for the heel. Not anything you could walk in, but more of a kind of restraint. Bondage boots!Anyone who knows me well knows that I am pretty obsessed with boots in general: how they are made, the fact that they are a combination of design, engineering and art all in one. These have been kicking around in my subconscious long enough, it was time to make them real. There are a lot of technical challenges to making a boot or shoe. Not the least of which is creating the "last" or form on which the boot is built. I am carving mine out of wood, but starting with a wrap of my model's foot and lower leg. This gives me a set of dimensions to work from when carving the last. Here's the wrap: I've indicated some measurement lines with a marker on the wrap, along with a rough indication of the sole shape on the bottom of the foot.
  Using the wrap as a guide I came up with a couple of shapes to cut out of my wood blocks. I first needed a side profile, which I traced onto the block.
  These shapes were cut out on the bandsaw.
  Next, I sketch a contour of the front elevation to cut out.
  I used tracing paper to transfer the lines from the first block to the second.
  At this stage, I want to remove as much wood as possible with the bandsaw. All the rest of the shaping will be done by hand, which is a lot of work.
  At this point, I think they look pretty good. I left the form a bit large, as I don't want to remove too much wood too soon. But I'm a little worried they will take a long time to carve down to size...
  You can see by the shape of the wrap lying beside the two blocks, there is a lot of material left to remove!
 At this stage you can see the last taking shape. The front one has been worked over a bit with the rasps, chisels and sandpaper to take on a more rounded shape.
  And here they are in their current state, the left a little further along than the right. I am doing a matched pair, as although it is twice the work, it's important to me to get the differences between the left and right shape.
  This is the first time I have tried to do this sort of thing, so bear with me if things don't turn out so great. I figure the best way to figure things out is sometimes to just go for it, and work out the problems along the way.
  I'm thinking only about 12 to 14 more hours of carving to go...
  Until next time, happy holidays!
Working on these items for Karen Hsiao has given me an excuse to make several things I have wanted to produce for a while now. One of those things is a nice, tight-fitting pair of extra-long bondage mittens. My wife has particularly small wrists, so I have wanted to make a pair to fit her skin-tight all the way up the arm. Because of the small wrist, you need to have some kind of opening for the hand to pass through. On old opera gloves, it was usually an opening with 3 buttons, but I am going to use a zipper for this project. I am making them out of a really gorgeous lamb leather from the Hide House in Nappa California. Working with lamb can be kind of tricky, as it is very soft and stretchy. You have to use a lighter-weight needle than you would for cow hide, and it can be almost like working with tissue paper because it is so thin. But for a project like this, the stretch and sheen are going to make beautiful mittens. I'm starting out with a pattern based on a previously-made mitten. But I've tapered in at the wrist a bit more, extended the length, and indicated placement of the zipper. The zip is starting just at the point at the forearm where the mitten will be too narrow to get the hand through, and ending in the palm of the hand.  I punch holes in the pattern to indicate the start and end points for the zipper.
  Here I have all 4 main pieces cut out. The pattern is flopped for each side, as the halves are not symmetrical. You can see the hand is wider on the thumb side.
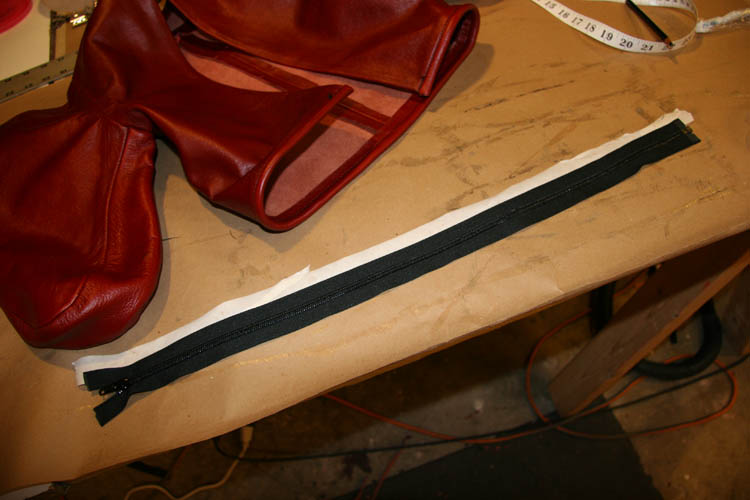
  I also cut out 4 strips that will form the "lips" of the zipper opening. I don't know what you are supposed to call those things.
  Since these will be one of the first things sewn-in, it's time to glue them up.
  While the glue dries, I'll punch out the start and endpoints for the zipper.
  Once the holes are punched, I carefully trim out between them with the x-acto knife. Go slow, use a fresh, sharp blade and a steel ruler to guide your cut.
 Now our glued-up strips should be ready to fold in half. See, this is one of the things that makes lamb tricky - notice the strips want to curl up. A heavier leather would probably just lay flat, but the lamb has a mind of it's own. You have to put it in it's place.
 We want to position those strips so they are centered on the openings we just cut.
  Because that lamb has a tendency to curl, I use quite a bit of tape to secure it.
  I am going to try and sew the zipper in at the same time as the lips, so I'm using double-sided tape to hold the zipper in position. I usually flip back and forth a bunch of times to check and recheck the position of the elements. Take your time here, as once it's sewn, it's sewn. There's no going back afterwards.
  Here's the zip and lip in place:
 You'll find with projects like these that you spend most of the time on the details - like this zipper. Sewing the actual mitten goes rather quickly, but the zipper takes forever!
  Now we have the zipper sewn in, so we can remove all that tape, cut the zipper to size and singe the ends with a flame. Next, I want to put in a tongue, so the zipper won't press against the skin.
  You want to make sure the tongue extends beyond the end of the zipper on both sides.
  Held in place with a little tape, I stitch along side the previous row of stitches.
  There we go. Now we have a nice, pretty tongue inside our zippered mittens.
  Next, we trim the excess tongue to follow the contour of the mitten.
 Finally, we're ready to sew the outside seam. This is pretty straightforward: just clip and sew.
  And, stitching complete!
 Now it's time to cut the little notches so we can glue down the seam allowance. Slits for inside curves, and little V-shaped notches for outside. Remember to not cut too close to the seam. Leave about 1/8 inch between your allowance cuts and your stitching.
 Now it's time to glue up...
 ...both sides.
 And press those seams flat. It is a pain to turn the mitten inside-out as the wrist is so small - this is about as small as you can go and still make it through. It is also a pain to turn down that edge because my hands are way too big to fit inside!The last thing to do is glue down the seam at the top of the mitten. Taking a cue from some unlined vintage gloves I have seen, I won't bother topstitching that top seam. It looks great, and will stretch more over time that way.
  That completes our bondage-mitten project. I am happy with them, and can't wait to see them on.
  This is the kind of garment that will just get better-looking once it's worn a few times and broken in.
  Until next time... thanks for visiting.
I have been busy as hell lately working on a few pieces for an artist named Karen Hsiao. Check out her website here. Or her blog here. She also does cute paintings as Miso, which can be found here. I first saw her photography and contacted her about working together, and she was interested. I was so excited, as I really love her stuff. So we started discussing ideas and concepts for future collaborations. But I wanted to make some more basic things for her to shoot right away, including a butterfly straitjacket in red leather. I had this great hide, rich and dark, which I thought would be perfect for her to shoot. Also, this was the first project on which I was able to use my new cylinder-bed sewing machine. Woo-hoo!So we start off with all the pattern pieces cut out: I mark the fronts of the arm-pocket sides.
  Also, I mark the front and back panels for the arm pockets.
  These get clipped together for sewing.
  I also clip up the body pieces, front to back at the top and sides.
  Those get sewn together.
 Now I clip the back panels to the sides on the arm pockets, and those are sewn.
  Now it's time for our first glue operation. But first I clip into the seam allowance to reduce bulk where the allowance lays flat.
  On the front and back arm pocket panels, darts are snipped in so the seam allowance lays flat.
 The sharper the curve, the wider the little "V" you cut out should be.
  But, never cut all the way to the seam itself. You don't want to weaken the seam. I usually stop at least 1/8-inch short.
  Once the little cuts have been made, time to glue the seams down. I used my little drying rig so I could have all the seams coated with glue at one time.
  Same idea with the body: both sides can be glued and drying at once.
  Once the glue is ready, the seams are pressed flat, and pounded gently with the mallet.
 At the ends of the glued-down seam allowances, we have these little tails.
 Remember, in order to not create a gap you can see through, trim only one side of the tail:
 Then flip the other tail over:
 This reduces the bulk at the seam, but won't create a gap at the intersection of the panels. Next, I clip the arm pocket in place inside the body.
  Make sure you have the side you want facing out oriented correctly. It's easy to get mixed up at this stage.
  Now, onto the cylinder-bed machine to attach the arm pocket. Here is where this machine excels. See how the arm-hole just slides over the cylinder arm?
  Easy, peasy!
 Have you ever wanted to kiss a machine? I have.
 Here's the stitch after the fact. Now we have the arms in place.
  Next, we'll join the 2 halves together at the front seam.
 Once sewn, those seams all get the glue-and-flatten treatment.
  The trickiest part of this is getting the glue neatly onto the inside seam.
 Once those seams are glued down, here is the result:
 Nice connection at the arm pocket.
  That front seam looks great as well.
 Next, it's time to attach the collar. Align on the center mark.
  Use copious numbers of clips to hold it in place, and sew.
  Since it's so cold in the workshop, I have to rig a hair-dryer to warm the glue.
  At this point I want to glue down all the open seams at the collar and down the back of the jacket.
  Only the collar and lower hem don't get glued, as they will both have a rolled-edge finish.

 At this point I trim the collar to make sure the left and right heights match.
  Then these little collar tabs are glued and folded down.
 Now we move to the lower edge of the jacket. I cut a strip to create the rolled edge. The strip is clipped in place, good-side against good-side, aligned with the bottom, and sewn about 1/8-inch from the edge.
  There should be a little overlap on either side when you are done.
  You will need that little extra to create a tab to tuck in.
  First, clip out leather from the stitch line to the edge of the jacket. Leave a little tab the size of your rolled edge.
  The rolled edge folds down.
 The little tab gets tucked around.
  See him hiding on the other side?
 Finally, the rolled edge comes up the backside, and traps the little tab in place.
  Let's do that again, but with glue this time...
 Here we are all glued up:
 And fold, tuck and roll - voila! A rolled-edge seam.
 Now you just topstitch to keep it all in place.
  All done now, except for the collar.
  This is the same treatment as the bottom edge. Clip the strip with a bit of overlap.
 Sew along the edge of the seam.
 Trim the tabs, glue, fold, tuck and roll.
  Pretty as a picture.
  Now that is starting to look like a jacket.
  Now, time for some closure. In this case, a YKK Separating Zipper. I like to use masking tape to hold the zip in place during sewing.

 Once the first side is sewn, I use tape to hold the other side so it is aligned perfectly.
  Once I'm happy with the position, the zipper can be opened for sewing.
  Here's with the 2nd side of the zipper sewn in.
  Finally, last but not least, it's time for the tongue. I cut a strip about 19 inches long and about 2-1/2 inches wide.
  This also gets the "tape in place" with the old masking tape.
  And then the tongue is top-stitched into position.
  And now we are done! Strip away the tape, trim a few loose threads, this one is complete.
  The leather is just so pretty on this one. I am really happy with the way it turned out.
  Until next time...

 I've indicated some measurement lines with a marker on the wrap, along with a rough indication of the sole shape on the bottom of the foot.
  Using the wrap as a guide I came up with a couple of shapes to cut out of my wood blocks. I first needed a side profile, which I traced onto the block.
  These shapes were cut out on the bandsaw.
  Next, I sketch a contour of the front elevation to cut out.
  I used tracing paper to transfer the lines from the first block to the second.
  At this stage, I want to remove as much wood as possible with the bandsaw. All the rest of the shaping will be done by hand, which is a lot of work.
  At this point, I think they look pretty good. I left the form a bit large, as I don't want to remove too much wood too soon. But I'm a little worried they will take a long time to carve down to size...
  You can see by the shape of the wrap lying beside the two blocks, there is a lot of material left to remove!
 At this stage you can see the last taking shape. The front one has been worked over a bit with the rasps, chisels and sandpaper to take on a more rounded shape.
  And here they are in their current state, the left a little further along than the right. I am doing a matched pair, as although it is twice the work, it's important to me to get the differences between the left and right shape.
  This is the first time I have tried to do this sort of thing, so bear with me if things don't turn out so great. I figure the best way to figure things out is sometimes to just go for it, and work out the problems along the way.
  I'm thinking only about 12 to 14 more hours of carving to go...
  Until next time, happy holidays!