
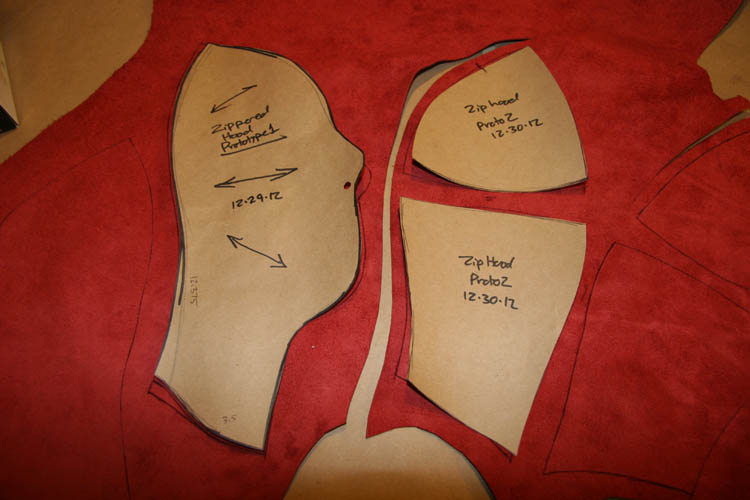
This was my first attempt at a hood for the Vanilla Gallery/Karen Hsiao Black Cherries project. It came out well enough from the front...

...but I didn't care for the amount of puckering I was getting at the rear along the zipper. It was caused because when I extend the rear panels to meet in the back, they pretty much became too long for the distance they had to cover from the top of the head to the base of the neck. The only way I could think to fix the problem was to split the rear panel into 2 parts. I knew if I made the seam where those 2 parts come together curved, it will help shorten the length and make the curved shape needed to conform to the back of the head.


I'm ready to set the zipper in place. I'm using my new method of separating the zipper and sewing one side in at a time without any clips or tape to hold the zipper in place.

The key to getting this to work is leaving enough extra zipper for two things. First, to make sure you can trim them so the ends are close to even when you are done sewing, so they line up when you put on the slider.

And second, you want enough room to place the slider on the zipper and get it going a little way...


When you get it right, it comes through nicely on the other side.

Now it's time for the tongue. A 1.75 x 12-inch strip.

This gets topstitched in place.

Now it's time to join the front half to the rear. Align on the center seam...

...and don't forget the 7th D-ring at the top of the hood!

Sewing complete.

Ready to glue and flatten the side seams.

And we're done!

Nice, strong D-ring on top. Seams look nice and centered...

...and the problem of the severe puckers has gone away along the rear zip. Looks much, much better!

No comments:
Post a Comment