Wednesday, February 25, 2015

Dark Babies photos by Karen Hsiao

My friend and artistic collaborator Karen Hsiao sent over some images she created recently. She calls them her Dark Babies. Oh, I like these...

That black lipstick...
Prints are available at her store

We're working on an entire new series that unfortunately I have to keep under wraps for now, but I can't wait until it comes to fruition. If my blog does go away, you can find my work on Karen's site. We still have lots of things left to do together!

Tuesday, February 24, 2015

The End is Near?

Well, it's been fun while it lasted folks, but according to an email I received today from Google, they're getting ready to crack down on blogs with sexual content... so this may be one of the last posts you will see from me. I haven't had a chance to decide what comes next, but at this point this particular blog's days are numbered. Just though I'd give you a head-up in case you never got around to downloading that hood pattern PDF or those f-suit images...


Wednesday, February 4, 2015

How To: Make a Boot Binder Sleepsack - PART III

Time to finish up the sack. First we need to fine-tune the connection between the hood and the body to get a smooth line. You can see in the image below, the hood seam needs to come in about 1/4 inch to meet the body seam. I usually try to have a little extra here, as it's better to trim down to size than to come up short...
 Once the lines are drawn and seam allowances cut, the entire rear opening is glued and turned in along the edge. 

 
 From the bottom of the heel pocket: 
 To the top of the hood: 
Glue is applied, allowed to set up, and the whole seam is turned and flattened with a mallet. 


Lately I've been sewing in the first half of the zipper without any tape or clips holding it in place. I just cut the zipper a bit oversized, separate it, and sew in the first half freehand. 

I also created a zipper stop on this piece, which allows me to have a neater finish (and less bulk) at the beginning and end of the zipper opening. 
I cut small rectangles of leather, and skived them down to minimize bulk and create a clean turned edge. 
These are sewn to the end of the zipper. 
 And held in place with double-sided tape. 
 I don't actually sew these to the zipper until it's partially sewn in. That way I can position it precisely based on what is needed. 

For the second side of the zipper, I'm using double-sided tape to hold the it in position. 
 This allows me to close up the entire second side (kind of a dry-fit), and make sure the leather on both sides of is properly aligned. 
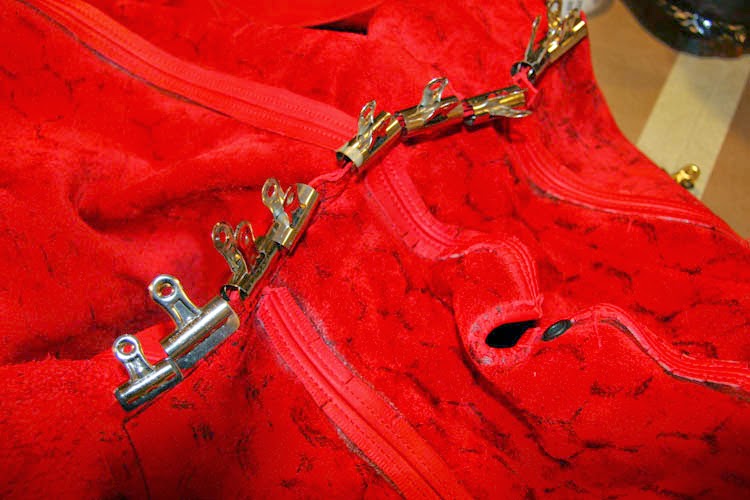
 Once I'm happy with the placement of the 2nd side of the zipper, I carefully unzip and use binder clips to hold it in place while sewing. The clips provide additional insurance that the zipper won't move out of position while being fed through the sewing machine. 
 It seems to work pretty well for me so far... Next, long strips are cut for the rear tongue. 

The tongue is also held in place with double-sided tape, and topstitched in place. 

 This sack has two additional sliders, so it can be opened anywhere you like along the rear. 
Next up: two internal sleeves with turned and sewn edges. 

These are positioned according to the pattern and sewn in place: first from the inside following the line. 
 And second: topstitched from the outside, using your first line of stitching as a guide. 
 Instead of backstitching, I just cut the threads long and tied them from the inside. Gives a neater look...
And finally, this sleepsack features nipple access. Circle shapes cut out and placed in just the right location... 
 These are held in place with double-sided tape, and topstitched. Very, very carefully - it's about as front-and-center as any stitching you'll do. Highly visible. 
 So, that brings to a close our sleepsack project. 
Hopefully I've given some ideas you may use for your own projects. 
 The ability to make things to your own specifications, and to fine-tune the design to meet your requirements is what custom leather crafting is all about. 


How To: Make a Boot Binder Sleepsack - PART II

In this post we'll make the hood and attach it to the body of the sack. We begin with our six hood parts: L+R front panels, L+R rear top and L+R rear bottom panels. 
The fronts are clipped together for sewing, along with the top and bottom halves for the rear panels. 
This center seam in the rear panel really helps make the hood take on the spherical shape of the back of the head, especially with a slightly heavier leather like this lamb-tan. The two rear panels are then sewn together an inch or so at the top. 
 These 3 seams get glued and flattened. 

 The front panel is stitched slowly and carefully, being sure to leave the mouth area open (at least on this version). This is the point where you want to do whatever variations you have in mind for the front of the hood: before you sew on the back. 
 I use the head form to start molding and shaping the hood. To me it's the most important part, and it has to fit perfectly. 
Working with the fitting hammer, scissors and razors, the seam is flattened and the leather around the mouth opening is folded back. You are sculpting the leather, almost like clay. 
 Take your time to work it, and get a nice smooth opening. 
 Trim, undercut and skive to get the seam as flat and smooth as possible. 
 Once I'm happy with the shape of the mouth, the front seam is topstitched. Can you see the path I took around the mouth? I think having no crossover of the center seam kind of gives the mouth a cleaner look. 
With the front of the hood complete (you can see I punched holes and set grommets for the nose), it's time to join the front of the hood to the back.  

Use clips to hold the front to back, aligning on the center seam. 
 Once sewn, it's on to the wood head form for the glue-up of the center seam. 
 I find it's easier to glue neatly on the form, and the hood is held in tightly in place with painter's tape. I also have been gluing first, and cutting the small darts after the glue has set up. Makes for a neater glue job...
 Once set up, the seam is flattened...
 I like to leave the hood on the form overnight to stretch it out a bit...
The next day, we have a hood ready to attach to the sleepsack body. 
Working inside-out, we align the hood on the center seam. 
 
 This is probably the most nerve-wracking to sew, as the different shapes coming together present a challenge. And it's a highly visible connection where the hood meets the body.

It has to be perfect, and at this stage any screw-up has the potential to ruin both the body and the hood. No margin for error, really...
 Fortunately, it turned out okay...
 Once it's topstitched, everything got a little brighter for me. Just stunning... And we're almost there.