OK, hopefully you all are ready to take on a new challenge. The foot pockets are a bit complicated by the inclusion of zippers. Typically I would place the zipper on the bottom of the foot pocket, but due to client request, the zippers for this f-suit have moved to the front seam of the foot pocket. Instead of being a straight seam, the zippers will now travel over the curve of the knee, which makes sewing and placement a little more challenging. We begin with the same number of pieces as the arm pocket, a front and back shape along with a side panel.  The first thing I want to do is indicate on the pieces the location of the zipper.
  I'll mark where the zipper will end...
 And where it should begin...
 Once that's done, we can get on to the first sewing operation. I'm going to attach the back panel to the side - that's the seam without the zipper. I'll clip and sew, as usual.
  First one done...
 Then the other...
 OK, we're ready for the zipper now. I'll be using my #5 YKK zipper chain.
  I cut the zippers to length, enough to extend beyond the openings on either end.
  Now I want to fold back the leather along the seam edge between the two marks I made earlier.
 I'll start out by applying the glue.
 Then cut notches where we have an outside curve.
 And slits where we have an inside curve.
 Here we have the seam folded flat, after the glue has set up:
 You can see the notches on the outside curve go away:
 And the slits on the inside curve open up:
 We're done with both sides, it's time to sew in the zippers.
  I'll be using masking tape to hold the zipper in place for sewing.
 I want that zipper nestled right up against the seam.
 And here it is after run through the machine, top stitched in place.
  At this point I want to put the pulls onto the zipper chain.
  Because leather is flexible I am going to sneak up on the zipper placement, rather than trying to clip and sew the whole thing in one shot. I would be afraid of misalignment due to the stretching of the leather as it is sewn. To avoid this I'm going to sew the first seam right up until the zipper begins. I'll start with the clips, up to the beginning of the zipper.
 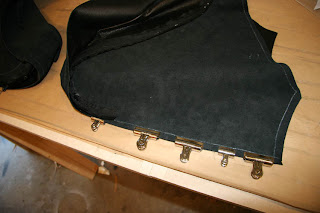 Here I have sewn until the zipper starts.
  Next, I'll glue and fold down the seam allowance in preparation for the topstitch, just like on the other side.
  Here's the side folded down and ready for the zip.
  I use masking tape and clips again to hold it in place.
  Here we have the seam after sewing. I still need to finish sewing the seam all the way to the toe, but will save that for later. For now it helps to be able to open the zipper and have access to the inside, because I still need to sew in the tongue.

 At this point I glue down and flatten the seam allowances inside.
 Here is the pocket with the seams glued and pounded flat:
 Now we are ready to sew in the tongue that runs inside the zipper and keeps it from pinching or being pressed against the flesh. We start with 2-inch wide strips about 28 inches long:
 I'll use tape to hold 'em in position while sewing.
  Here's an inside view:
 The tongue is top-stiched in place using the previous row of stitches as a guide. The outside after tongues looks like this: (see the double-row of stitches?)
 Now we can finish up that foot pocket...
 I use the clips from the inside, and sew right to the edge of the zipper.
 Here's the view from the outside, after stitching and flattening:
 At this stage I run some stitches at the ends of the zippers to keep the pulls in place. This completes the zipper sewing. Only one part left for the foot pockets...
 And that is attaching the bottom panels.
  I use the centerline marks to align the foot bottom to the rest of the pocket.
 Clips again hold the bottom in place. This is sewn inside-out.
  The seam after sewing:
 Once sewn, it is just a matter of gluing, trimming and pounding the seam allowances to make everything flat and neat inside the pocket.
  Here's a detail view of the foot pocket upon completion.
 And there you have it, the foot pockets are now complete!
 Ready for attaching to the body...
 We are getting there, people - slowly but surely. Just the hood, body, blindfold and gag to go! See you next time...
Today we're working on the arm pockets. Arm pockets are simple enough - sort of shaped bags to restrain the arms and keep them out of trouble. Each consists of three pieces: a front, back and side strip: I've marked the Right Front and Left Front pieces to make sure the best looking leather is towards the front of the suit.
 We're ready to start sewing, and for me that means it's time to break out the bulldog clips.
 I start at the shoulder and clip the side strip to the front panels for both arm pockets.
  I have had some requests for information about the equipment I use, and I will have a future post dedicated to that in detail, but for now I wanted to show you all my work horse beast of a sewing machine, Betsy:
  She may not be pretty, but she's strong and she's tough and doesn't mess around when it comes to sewing. She's an industrial walking-foot sewing machine designed specifically to sew light to medium-weight leather.
 She's from ArtisanSew and really took me to new places in terms of the types of work I could do and the quality of the results. Using her made the Singer portable I used to use seem like an under-powered toy.
  I was doing research into other brands before I bought her (including Juki and Consew), but the thing that swayed me was a comment from an old gentleman who used to run an industrial sewing machine shop in Long Beach, CA (since closed down, unfortunately - I think he might have passed away). He said to me (while I was checking out an expensive Consew) "If I were you I would get an Artisan machine - they are really great." and about $500 less than the Consew. Great advice, and it's been a great machine since day one. It's a lockstitch machine with variable stitch length and a reverse-bar.
 Betsy just powers through the thickest leather, and the stitches are tight, even and never miss.
  She has a dual-bobbin setup so you can be constantly winding new bobbins while pulling the main thread from the large spool. You will never run out of thread on this machine!
 I have sewn with her for years and it seems like the amount of thread never goes down...
 These industrial machines are strange animals compared to the dinky home portables. For one thing, they weigh a ton. The head on this machine weighs about 100 lbs. It also sits on top of a reservoir of oil, which is pumped up into the machine as it works. It's a messy pain in the ass to move.
  And yes, you have to change the oil occasionally, like in your car.
  Here you can see the bobbin winder. It's very quick, and you can have bobbins winding constantly while you sew.
  Underneath the worktable, you can see the motor and the knee-pad that lifts the presser-foot. This allows you to lift the foot while keeping both hands on the workpiece.
  The motor is huge, sweet, powerful and quiet. Made for a production environment, it hardly breaks a sweat with my projects.
  Here's the bobbin, because why the hell not?
  It's a good large-capacity which helps when you are sewing with heavier thread. Plus it sucks to spend all your time changing out the bobbin because you ran out of thread. Bigger is better.
  OK, let's get back to our sewing... Put that baby on Betsy and let her rip!
 Side panels connected to the front panels...
 Now we clip the rear panels to the sides, just like before... and sew...
 ...and voila! We have pockets.
 Now it's time to break out the glue and fry a few brain cells... And the disposable brush as well, of course.
  Glue up those seam allowances...
 I used a little rigging to let the glue set up without laying the pieces down. It was necessary because these had glue on almost all sides. Didn't want them sticking to the table...
 After the glue sets up (you can tell because it turns clear), it's time to fold down the seam allowances. On the arm pockets, the side panel can fold down without trimming, but for these inside curves on the front and back panels you need to trim off the excess...
 Like so:
 You can tell if you neighbor is a kinky crafter: just look for little triangles of black leather stuck to his shoes. It's a dead giveaway...Time now to break out the mallet, and genly tap the seams flat. This helps the glue to adhere everything together and coaxes the leather into taking shape.
  Here's the pocket inside-out with seams flattened:
 And turned outside in:
  That's it. We have completed the arm-pocket sub-assembly!
 Here's the pair, ready for flight...
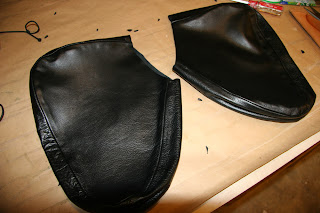 I'll just put these aside until we are ready to connect them to the body...
 Next time we'll tackle the leg pockets, which are a bit more complicated because they contain zippers (cue dramatic music). Of course I did the easy part first - wouldn't you? See you next time!
Hello, and welcome to the new people out there following and visiting the blog. I must say it's been totally cool to hear from those of you who have contacted me, and I very much appreciate the positive feedback, and am glad that people are enjoying the blog. I had hoped it wouldn't have an audience of one when I started out, and so far so good on that count. Thanks for reading along, and feel free to contact me with questions, comments or feedback at any time. It may take me a while to get back to you, but I'll respond to everyone who writes eventually!So, I've been busy lately with the f-suit project that is finally in the production phase. This is the build that I was going to take you through step-by-step, and f-suit with a custom hood, gag and blindfold.So far I have created design drawings and have had numerous discussions with the client, who is a very creative and detail-oriented kinky person like myself. We get along well, needless to say. I initially created a pattern based on the measurements provided, and from that made a prototype in vinyl. Based on feedback from that test fit, I modified the pattern and am finally ready for the fun part - the cutting and sewing of the leather (woo-hoo!).We're starting with a really beautiful black cowhide that is just the right combination of properties for this project, thick (but not too thick), soft but strong full-grain leather. I always use full-grain leather as opposed to top-grain or splits for my projects, as the natural beauty of the grain is intact. It is the most expensive and highest quality leather. Top-grain leather is less expensive and usually split, sanded and embossed with a leather texture that to me always looks fake - and it isn't as strong as full-grain, which is important when you are making restraints. Finally there is a character that comes through when you see the natural texture of the leather as it comes together in the piece - it makes each restraint completely unique. It becomes part of the soul of the piece. This hide is about 50 square feet, and as you can see it barely fits on my layout table, which measures eight by four feet: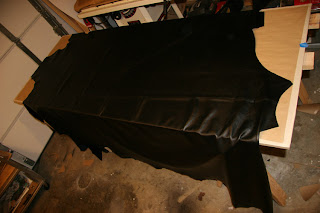 I am trying to show the texture and the weight of the leather here... It's really pretty stuff. Thick but soft. Usually when making restraints, the heavier the leather, the more restrictive-feeling the garment turns out. Makes sense when you think about it, but it's one thing I think of when I see the cheap sleepsacks from India that are sold online. They are so thin, I don't think they could offer much of a restraining feeling... This is kind of off the subject, but it brings up one point about why high-quality fetish gear is so expensive. The raw materials for this project cost more than the entire cheapo sleepsack made overseas.
 OK, one thing about top-grain leather: since the surface hasn't been sanded down and re-embossed with fake leather texture, you have a real animal's skin which means you'll find marks from branding, insect bites, scars. On our hide there are several brands visible. One looks like a series of four letters:
 And this one looks sort of like an anchor:
 And I came across this small blemish as well. You start out with the leather good-side up so you can spot all these blemishes and imperfections, and make sure to avoid them when laying out your pattern pieces.
  Since the pattern is laid out on the back side, I put a piece of tape there to mark the location of the blemish on the other side. The brands show through quite well (I know, poor cow, right?).
  Now we can begin laying out the pattern pieces. You want to be as efficient as possible, and try and keep the waste to an absolute minimum. Also, I try and keep the best looking leather in the most visible parts of the piece.
  Here we have all the pattern pieces traced onto the leather...
 And here we have them all cut out:
 Here we have most of the front-panels and arm-pockets.
 Here is the left and right rear panels, along with the bottoms of the foot pockets.
 And in this shot, the leg pockets, and the bands that complete the sides of the arm and leg pockets.
  I know that didn't seem too hard, but this is actually a pretty complicated project with lots of pieces and components. Stick with me and I'll take you though all the down and dirty details...

 The first thing I want to do is indicate on the pieces the location of the zipper.
 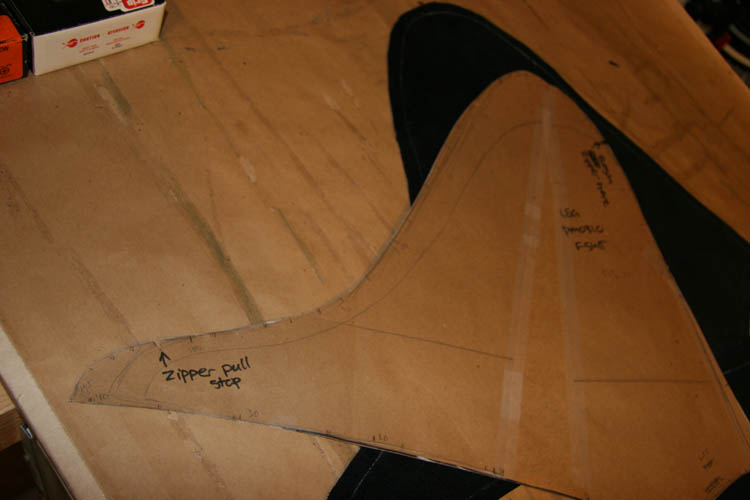 I'll mark where the zipper will end...
 And where it should begin...
 Once that's done, we can get on to the first sewing operation. I'm going to attach the back panel to the side - that's the seam without the zipper. I'll clip and sew, as usual.
  First one done...
 Then the other...
 OK, we're ready for the zipper now. I'll be using my #5 YKK zipper chain.
  I cut the zippers to length, enough to extend beyond the openings on either end.
 I'll start out by applying the glue.
 Then cut notches where we have an outside curve.
 And slits where we have an inside curve.
 Here we have the seam folded flat, after the glue has set up:
 You can see the notches on the outside curve go away:
 And the slits on the inside curve open up:
 We're done with both sides, it's time to sew in the zippers.
  I'll be using masking tape to hold the zipper in place for sewing.
 I want that zipper nestled right up against the seam.
 And here it is after run through the machine, top stitched in place.
  At this point I want to put the pulls onto the zipper chain.
  Because leather is flexible I am going to sneak up on the zipper placement, rather than trying to clip and sew the whole thing in one shot. I would be afraid of misalignment due to the stretching of the leather as it is sewn. To avoid this I'm going to sew the first seam right up until the zipper begins. I'll start with the clips, up to the beginning of the zipper.
  Here I have sewn until the zipper starts.
  Next, I'll glue and fold down the seam allowance in preparation for the topstitch, just like on the other side.
  Here's the side folded down and ready for the zip.
  I use masking tape and clips again to hold it in place.


 At this point I glue down and flatten the seam allowances inside.
 Here is the pocket with the seams glued and pounded flat:
 Now we are ready to sew in the tongue that runs inside the zipper and keeps it from pinching or being pressed against the flesh. We start with 2-inch wide strips about 28 inches long:
 I'll use tape to hold 'em in position while sewing.
  Here's an inside view:
 The tongue is top-stiched in place using the previous row of stitches as a guide. The outside after tongues looks like this: (see the double-row of stitches?)
 Now we can finish up that foot pocket...
 I use the clips from the inside, and sew right to the edge of the zipper.
 Here's the view from the outside, after stitching and flattening:
 At this stage I run some stitches at the ends of the zippers to keep the pulls in place. This completes the zipper sewing. Only one part left for the foot pockets...
 And that is attaching the bottom panels.
  I use the centerline marks to align the foot bottom to the rest of the pocket.
 Clips again hold the bottom in place. This is sewn inside-out.
  The seam after sewing:
 Once sewn, it is just a matter of gluing, trimming and pounding the seam allowances to make everything flat and neat inside the pocket.
  Here's a detail view of the foot pocket upon completion.
 And there you have it, the foot pockets are now complete!
 Ready for attaching to the body...
 We are getting there, people - slowly but surely. Just the hood, body, blindfold and gag to go! See you next time...


