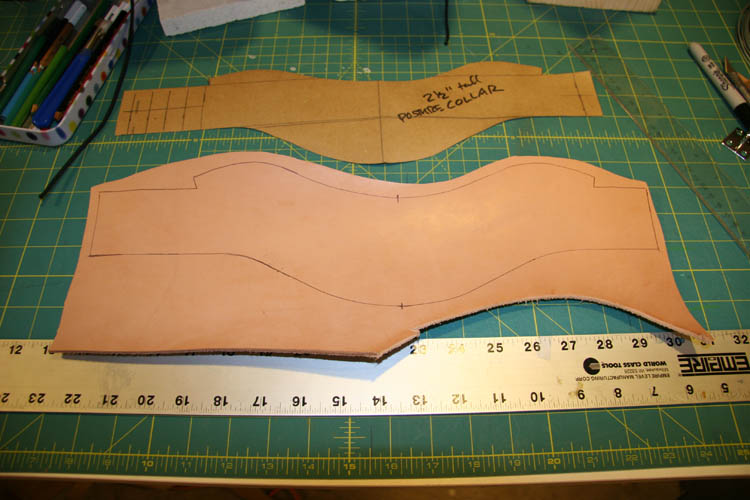
This is a fun and relatively easy project that doesn't even require a sewing machine if you don't have one - it can be hand-stitched. I came up with the original pattern for this posture collar a number of years ago, and I really love it. The posture collars on the market at the time didn't fit very well, so this was my attempt to make one that fits better. I like this one because it does fit extremely well, and it is nice and tall and restrictive. You could always modify the pattern to make it shorter, or to fit a larger neck. We start with the pattern, which is available here as a PDF. Please ignore the writing on my pattern in the photo below - the collar is actually 3.5 inches tall in front (not 2-1/2").  Unlike most of my projects, which are made of garment leather, this one is going to be made out of what is called vegetable-tanned leather. It is stiffer, heavier, and used for making belts, holsters, and basically anything that you want to be tough, strong, and to last forever. This hide is a 7-8 oz weight, and I ordered it from the Hide House in Nappa Valley, CA.
 Because I'm not too worried about leaving marks on the edge (as it will be rounded off later), I just use a ball-point pen to trace out the pattern on the leather.
  Next, I use my straight-edge knife to rough-cut out the workpiece. This blade is by Osbourne tools, and can be easily resharpened. Leather, especially this heavy-weight veg-tanned stuff is very abrasive, and will dull your blade quickly. It is way too heavy and tough for the scalpel or scissors I usually use.
  Rough cut complete...
 Next up, time to pull out the x-acto. You should use a fresh blade, as ideally you will cut through the entire thickness in one stroke. You can pull the knife more than once through the cut, but will need to keep the angle you are holding the blade as consistent as possible so you have a nice, clean, square edge. This can be extra hard to do on the curves, so a sharp blade is vital.
  Now we're done with the finish cut stage. You can breathe again.
  Next up, is the edge-beveller tool. This will round off the cut edge, and you will want to use it on both sides all the way around the piece.
  Here's a closeup. See the cutting edge between the two guide posts? It forms a little channel to limit your cut, keeping it consistent all the way around. It's almost too easy.
  Action shot!
  And, here's how we look after that:
 Normally, to finish a raw edge like this, you would now "slick" it using a burnisher and something like gum traganth. This smooths and polishes the leather fibers along the edge. But, initially I was planning on putting a rolled edge on this piece - so I didn't go through with that sort of edge treatment. Next up, time for the patent leather that will go on the outside of the collar.
  Because of the thickness of these 2 pieces of leather, you have to make sure your outer layer is longer than the inner layer - as it will take more room to cover the inner piece once you start to from the curve. Think about a racetrack: the outer car has further to go than the car on the inside lane. Same principal applies here.
  Once I have my outer piece cut, they both get glued up.
  At this point you can see the two pieces stuck together, and they are taking on the curved form.
  If you glued them together flat, you would never get them to take on the shape of the curve. Once you have them curled and glued, they will have no chance of laying flat.
 Once the glue has set up, I trim the outer patent to match up with the inner veg-tanned leather carefully with the x-acto knife. It's a tricky cut, as you don't want to cut into the veg-tanned leather if you can help it. Also, you need to cleanly cut the patent, as any mistakes will show in the final piece. There's no "undo" button.
 This is the part where I go for the sewing machine. The cylinder bed is perfect for this curved collar shape, but if you don't have a sewing machine, you could always punch holes along the edge and hand stitch the two pieces together.
  Stitching complete...
 Now it's time for the hardware. I was looking around forever before I located a source for the little locking hasps I'm using on this project. I couldn't find them anywhere, partly because I had no idea what they were called which makes it difficult to do a google search. Well finally I discovered a place that has all kinds of hardware for leather craft - and not the usual tandy-type country/western conchos and stuff. More modern, chrome (and even some S&M style) hardware too. It's called Ohio Travel Bag and the part is a 1-1/8 inch welded chrome staple plate! I can't explain to you how happy I was to find that stupid part... STAPLE PLATE, STAPLE PLATE!Anyway, first we need to mark a position for the staple plate to be attached, and because marks won't show up on the black patent leather very well, I use masking tape as a temporary surface.
  Once the tape is down with the center marks, I can position the staple plate and mark the hole position.
  Next, I punch out the holes and check for alignment. Looking good!
  I am going to attach the staple plate with another new piece of equipment, this time from Weaver Leather. They have a little-wonder benchtop riveter that does a great job on projects like this. It's a bit snug because the holes are so close to the staple, but I just manage to set the rivet without a problem.
  The trick with the rivets is selecting the right length. You need to be about 1\16" longer that the material you are setting through so there is enough room for the rivet to deform inside the cap. This "deformation" is what holds the cap in place.
  All four rivets set:
 And here's the view from the back side, with the rivet caps.
  Next, it's time to cut the slots for the other side of the collar. I use the tape method again, so I can see the placement marks for the slot cutter.
  I use the pattern with holed punched at either end of the desired slot position to make the guide marks.
 Using those marks as a guide, I use the slot cutter to make the holes. I think I used the 7/8-inch slot cutter, which created a nice, snug-fitting slot for the staple to fit through. It fits like a charm!
 That completes our posture collar project. Initially I thought of doing a rolled-edge at the top and bottom of this collar, but I really liked the look of it without. It's very sleek and clean with the black patent on the outside, and the contrasting fleshy-tan inside was just cool looking.
  I decided to stop while I was ahead, and am happy I did. This collar will provide many years of play-time fun.
  Until next time, take care...
 Still in progress in the workshop is my latest obsession: making a boot last for a pair of custom-fit ballet-style boots. These are also sometimes known as toe-boots. I neglected to show a sketch before, so you can see where all this insanity is heading - please see above if you are interested. These won't be made for walking, but are more for bondage or bedroom playtime. I love the idea of clothing or shoes that restrict or change the way you move, and these definitely riff on that idea. I also wanted to make a boot where the heel is shaped like a loop, that can be used as a tie-down or a kind of handle.Here are the lasts in their current state, one a little further along than the other:
 This post will share a couple of tips that I think would have helped me had I known them before I started. I don't know how many people out there might be interested in this sort of thing, but you never know... I have searched all over for this kind of information, so there just might be someone else out there who is crazy enough to give this kind of project a shot.First up, I'm using a measurement device to make the diameter of both lasts the same at certain points along their length. This is based on the "story stick" idea from woodworking, where you transfer measurements on a stick rather than making a series of measurements and trying to remember them all.
 I use a piece of card stock with marks indicating places where I took measurements of the diameter of the wrap I made of my model's leg. That is my target size, or the measurement I want to match with the last.
 Next I place the "story stick" card on the last and transfer the marks so I know where to measure.
 At the top of the card near the mark, I have indicated the size diameter I am working towards. The numbers on the bottom show the current measurement. As I remove material, I can get an idea of how far I have to go, and how much material still needs to be taken away. I cross out the old measurements, and know the most recent one is at the top of the list. There are 2 columns, one for the left last and one for the right.
 One thing I found helpful is to have a flat area to securely clamp the last while I'm working on it with the rasps and sand paper. The foot naturally lends itself to being clamped, at least at this stage. I worked on the rounded part of the leg and calf first, and will work on the foot near the end.
 To secure the workpiece, it helps to have additional clamps holding wood blocks against the last. Because I am working on all sides, it helps to have these easily re-positionable. The more contoured the shape, the harder it is to clamp it down properly, so it gets more difficult as you go along.
 To help stabilize the workpiece further, I created a couple of curved-cutout holders which could be positioned under the curved parts of the last to hold it in place. These helped a lot.
 It also helped to have a little flat spot at the back of the heel to provide a stable point to clamp when working on the front of the last.
 The tape-wrap I made really comes in handy to refer to along the way.
  I can take measurements from it, and get a sense of the contour I am trying to create. Here for the bottom of the foot, for example it really helps.
  I also recently purchased a digital caliper which makes precise measurements a breeze. I can measure the wrap at different locations and compare those with the current state of the last to see how far I still have to go to.
  Finally, although I am not there yet on the form of the foot, I can check the overall shape by wrapping the wood form in plastic wrap and duct tape.
  I wrap it pretty tight and use a couple of layers, then cut the wrap off of the form to test on my model.
  I'm happy to say it is getting close, the shape is good, and according to the test there are no major problems. Just a few more hours of shaping to go...
 Of course, shaping the foot will be the hardest part. Then I get to do it again for the other foot. I always like to leave the best for last. (Not really!)
Until next time...
I just received the first set of images from Karen Hsiao from her recent photo shoot using some leather gear I made. I contacted her a while ago when I came across her images on the web because I was completely enchanted by her work. I so loved the look of her photographs and artwork that I really wanted to collaborate with her, in any way possible. Some kind of project, anything, let me make some things for you, I told her. She was just bursting with creativity, and was also completely kind, intelligent and fun to boot. It was great to meet her.
 Now, I have a certain ardent passion for beautiful Asian women, and of course a bit of a thing for leather gear, bondage and hoods as you might have guessed from this blog. Put the gear and girls together and you have the makings of some seriously powerful images to me - the photographs Karen has taken could have easily originated somewhere in my subconscious or in my deepest-kept dreams, but in this case the dream is made real. I find them just incredible. I just can't stop looking at them...
 I love the soft, sensual feel she captures in these shots. For me, bondage is about trust, vulnerability, surrender. There is so much bondage imagery that doesn't click for me, with the whip-cracking domina towering over her cowering slave. Not that there's anything wrong with that if you like it, but I'm more into the playful, the sensual. The sadistic and painful? Not so much...
Plus, I really love hoods. To be hooded is to give up your sense of sight and sound, and this creates a focus on the 3 senses you have left: smell, taste and touch. These become amplified, more intense. It's a way to tweak your sensory system without drugs or alcohol. These open-mouth hood focus all the attention on the lips, both for the wearer and the viewer. The mouth is already one of the most sensual organs of the body. Can you look at those lips below, and not think of kissing or being kissed in a hood? Or fed a strawberry...
I love the soft, sensual feel she captures in these shots. For me, bondage is about trust, vulnerability, surrender. There is so much bondage imagery that doesn't click for me, with the whip-cracking domina towering over her cowering slave. Not that there's anything wrong with that if you like it, but I'm more into the playful, the sensual. The sadistic and painful? Not so much...
Plus, I really love hoods. To be hooded is to give up your sense of sight and sound, and this creates a focus on the 3 senses you have left: smell, taste and touch. These become amplified, more intense. It's a way to tweak your sensory system without drugs or alcohol. These open-mouth hood focus all the attention on the lips, both for the wearer and the viewer. The mouth is already one of the most sensual organs of the body. Can you look at those lips below, and not think of kissing or being kissed in a hood? Or fed a strawberry...
Some people think that hoods are about de-humanizing or de-personalizing someone, but that's just not what it's about for me at all. It is more about the sensory journey, the altered mindset a hood puts the wearer in. It lets some people relax and let go. It's not about hiding someone's face. I love the fact that inside those hoods are two very pretty girls.
 It's almost dreamlike to have the things I made a few weeks ago come back to me in the form of images like these. I am just humbled and greatful for the opportunity. Thanks so much Karen, for allowing me to post and share the images. Your work is just awesome!
 I am not sure if she will be making prints of this work available, but if you are interested, I would suggest you contact her directly. Karen Hsiao's website is here and her blog is here. If you want to see more of her work, please check it out!
Wishing a Happy New Year to you all...

 Unlike most of my projects, which are made of garment leather, this one is going to be made out of what is called vegetable-tanned leather. It is stiffer, heavier, and used for making belts, holsters, and basically anything that you want to be tough, strong, and to last forever. This hide is a 7-8 oz weight, and I ordered it from the Hide House in Nappa Valley, CA.
 Because I'm not too worried about leaving marks on the edge (as it will be rounded off later), I just use a ball-point pen to trace out the pattern on the leather.
  Next, I use my straight-edge knife to rough-cut out the workpiece. This blade is by Osbourne tools, and can be easily resharpened. Leather, especially this heavy-weight veg-tanned stuff is very abrasive, and will dull your blade quickly. It is way too heavy and tough for the scalpel or scissors I usually use.
  Rough cut complete...
 Next up, time to pull out the x-acto. You should use a fresh blade, as ideally you will cut through the entire thickness in one stroke. You can pull the knife more than once through the cut, but will need to keep the angle you are holding the blade as consistent as possible so you have a nice, clean, square edge. This can be extra hard to do on the curves, so a sharp blade is vital.
  Now we're done with the finish cut stage. You can breathe again.
  Next up, is the edge-beveller tool. This will round off the cut edge, and you will want to use it on both sides all the way around the piece.
  Here's a closeup. See the cutting edge between the two guide posts? It forms a little channel to limit your cut, keeping it consistent all the way around. It's almost too easy.
  Action shot!
  And, here's how we look after that:
 Normally, to finish a raw edge like this, you would now "slick" it using a burnisher and something like gum traganth. This smooths and polishes the leather fibers along the edge. But, initially I was planning on putting a rolled edge on this piece - so I didn't go through with that sort of edge treatment.
  Because of the thickness of these 2 pieces of leather, you have to make sure your outer layer is longer than the inner layer - as it will take more room to cover the inner piece once you start to from the curve. Think about a racetrack: the outer car has further to go than the car on the inside lane. Same principal applies here.
  Once I have my outer piece cut, they both get glued up.
  At this point you can see the two pieces stuck together, and they are taking on the curved form.
  If you glued them together flat, you would never get them to take on the shape of the curve. Once you have them curled and glued, they will have no chance of laying flat.
 Once the glue has set up, I trim the outer patent to match up with the inner veg-tanned leather carefully with the x-acto knife. It's a tricky cut, as you don't want to cut into the veg-tanned leather if you can help it. Also, you need to cleanly cut the patent, as any mistakes will show in the final piece. There's no "undo" button.
 This is the part where I go for the sewing machine. The cylinder bed is perfect for this curved collar shape, but if you don't have a sewing machine, you could always punch holes along the edge and hand stitch the two pieces together.
  Stitching complete...
 Now it's time for the hardware. I was looking around forever before I located a source for the little locking hasps I'm using on this project. I couldn't find them anywhere, partly because I had no idea what they were called which makes it difficult to do a google search. Well finally I discovered a place that has all kinds of hardware for leather craft - and not the usual tandy-type country/western conchos and stuff. More modern, chrome (and even some S&M style) hardware too. It's called Ohio Travel Bag and the part is a 1-1/8 inch welded chrome staple plate! I can't explain to you how happy I was to find that stupid part... STAPLE PLATE, STAPLE PLATE!
 Once the tape is down with the center marks, I can position the staple plate and mark the hole position.
  Next, I punch out the holes and check for alignment. Looking good!
  I am going to attach the staple plate with another new piece of equipment, this time from Weaver Leather. They have a little-wonder benchtop riveter that does a great job on projects like this. It's a bit snug because the holes are so close to the staple, but I just manage to set the rivet without a problem.
  The trick with the rivets is selecting the right length. You need to be about 1\16" longer that the material you are setting through so there is enough room for the rivet to deform inside the cap. This "deformation" is what holds the cap in place.
  All four rivets set:
 And here's the view from the back side, with the rivet caps.
  Next, it's time to cut the slots for the other side of the collar. I use the tape method again, so I can see the placement marks for the slot cutter.
  I use the pattern with holed punched at either end of the desired slot position to make the guide marks.
 Using those marks as a guide, I use the slot cutter to make the holes. I think I used the 7/8-inch slot cutter, which created a nice, snug-fitting slot for the staple to fit through. It fits like a charm!
 That completes our posture collar project. Initially I thought of doing a rolled-edge at the top and bottom of this collar, but I really liked the look of it without. It's very sleek and clean with the black patent on the outside, and the contrasting fleshy-tan inside was just cool looking.
  I decided to stop while I was ahead, and am happy I did. This collar will provide many years of play-time fun.
  Until next time, take care...


