Sunday, October 5, 2014

Making Leather-Covered Buttons

So I got a new toy in the workshop recently: an Osborne button-making press. It all started when I volunteered to make a friend of mine a tufted leather headboard for her king-sized bed. Of course we needed matching leather-covered buttons, right? How hard could it be? 

My new toy!
 Turns out the Osborne W-1 Hand Button Machine press is very heavy-duty, and a lot larger than I thought it would be. It seems to be made for serious production work. The long handle gives you plenty of leverage, and you will definitely need to bolt this machine down to the workbench. 
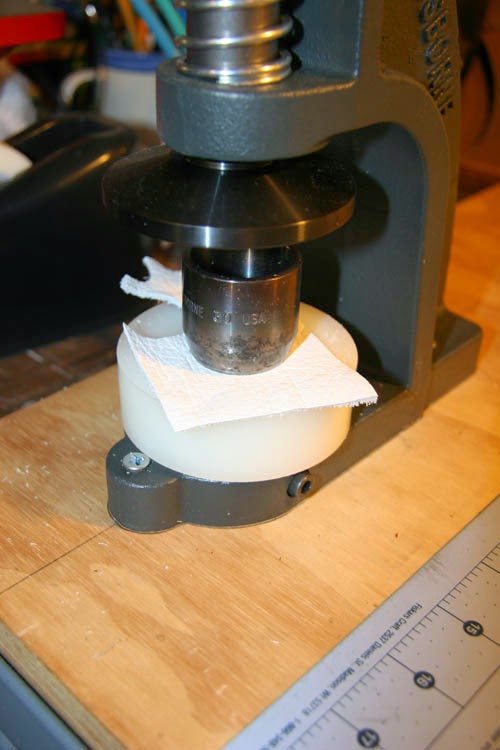
A close-up of the business end.  
You have to order the proper die-set along with the machine to match the size of the buttons you want to make. I got the #30 which is for a 3/4" button, along with the blanks for the wire-back buttons, and the nylon tufting twine - each is sold separately. 


The die set consists of a cutter, a top and bottom die, an allen wrench, dowel and nylon cutting block. 
 The bottom die is a spring-loaded contraption which will take the wire-back part of the button. 
 There's a hole in the middle to accept the wire protruding from the back.
 The top die takes the leather blank and the part that becomes the front of the button. 
 It slides back and forth sort of like a piston. 


 The cutter is a nice beefy cookie-cutter type of circle punch. 
 Used with the nylon block, it should easily punch oodles of perfectly-sized leather circles. 
 To begin, place the nylon block in the press. 
 Place your leather on top of the nylon block with the cutter on top of that, roughly centered under the top plate. 
 Apply some pressure to the handle and you get a satisfying "chunk" as the circle cutter slices through the leather. 
 At this point, I'm going to pull out the skive to shave the leather down a bit, thickness-wise. I tried to make a button with the full-thickness leather, but it was a no-go. I think the whole machine is set up for thinner upholstery cloth-covered buttons, so it takes some fine-tuning to make the leather work with these buttons and dies. 
 In case you don't know: the skife is a razor blade knife where there is a slight curve to the cutting edge. This is perfect for shaving down the thickness of a piece of leather in a controlled manner.  
 I work on a piece of glass, because every other work surface I have would otherwise be damaged by the knife. 
 We're starting with a 1.07mm thickness on the leather. 
 After shaving the backside down carefully...
 ...I end up at .68mm thick. It makes all the difference in the world. 
 We're ready to grab our button blanks. One for the front, and one for the back. 
 Take the top die.
 Place the leather blank face-down into the die. 
 Take your blank button front.
 Place it face-down in the center of the top die, and push it into the hole. 
 Use the dowel to push the button front and leather all the way down. 

 You should be able to see leather all around the button face.
 Now take the bottom die. 
 Load it into the machine (you can secure it with the allen wrench set screw). 
 Place the wire-back of the button into the bottom die. 
 The wire should be facing down.
 Take the loaded top die...
 ...and place it on top of the bottom die. 
 Pull the handle down, and you should get this: 
 At least that's what I got at first: a messed-up button. See the cut along the edge? Too much pressure. 
 I found it handy to use a little screwdriver to remove the finished button from the die. 
 Try again, and with a bit less pressure you can get the button to turn out okay (without the cut through part). 

 When they turn out right, the leather tightly wraps around to the back, and the whole thing is held in place through crimping and pressure. It's almost magic. 
 I probably messed up one button for every two that turned out, but I'm sure with practice I could do even better. I'd recommend giving yourself time and extra leather to get the formula down pat. 

 I went ahead and got the tufting twine, as I didn't think any of the threads I have could handle the extreme tension these buttons will place on it. 
 I used a heavy-duty needle to thread the buttons through the sewn seams. 
 I put both ends of the thread through the eye of the needle. 
 I found I didn't need a pilot hole, I just put the needle in the center of the seam and pulled it through to the backside. 

 Given a decent tug, the thread and wire back nestled between the stitches and sat nicely in place. Check back later, and I'll show you how the finished project turned out. 

Tuesday, September 23, 2014

Permaid arrives in LA!

For all you total-enclosure fans: Great news! A gorgeous creature by the name of Permaid has washed up on the beaches of LA. 

She has quickly adapted to life on the dry side of the ocean, securing proper summer reading material and a colorful beach towel. Even goggles: perhaps to keep in the moisture?  

Of course, being a citizen of dry land, she needs to do her time filling out forms at the DMV like the rest of us. I wonder if she can manage a stick shift?

All this flopping around must be tiring. Fortunately, she found a scenic place to rest...

I think I saw this in a comic book by LEE (The Bonders?) a while ago...

Permaid makes new friends while checking out the patio furniture at CVS. 

She even has merchandise available, and more to come I hope!
To find out more about Permaid, check out her website here, or follow her on instagram. 

Wednesday, September 10, 2014

Soft Pink Bondage set for EM

I'm happy to present a few beautiful images by "-EM-" a friend from fetlife who I consider one of the most talented bondage photographers working today. He doesn't claim to even be a real photographer, but I challenge you to find someone making such compelling, stunning and downright sexy images (check out his gallery if you don't believe me). He's proof that with passion and a good eye, formal training is not required to make drop-dead gorgeous bondage photos. Talented bastard! Oh, and it doesn't hurt that an assortment of beauties submit to his creative impulses, and allow the results to be shared with us. I did a custom hood and armbinder in pink for him to put to use, and this is the result:

Custom-fit ultra-tight laced armbinder in pink by yours truly, with matching nose-only hood. 

Just for reference: Armbinders: this is the way it's supposed to fit.


We have a few projects still on the drawing board. I'm looking forward to seeing them come to fruition...

Saturday, September 6, 2014

Restricted Senses: Total Enclosure Sleepsack Struggle

Mina struggles beautifully in her heavy, dark leather prison. 

If you are a fan of sleepsacks like me, you probably have been waiting for (dreaming of?) a certain type of movie. It will start with a beautiful Asian girl smiling at you as she runs her hand over the heavy leather restraint she is about to be tormented in. 

Slowly, she'll slip in and wiggle seductively into her dark leather prison. Gorgeous body and beautiful face slowly enveloped by the dark shiny form. Next, the zipper is pulled down, encasing her head in a tight leather embrace. Then, pulled more, until finally the poor girl is fully enclosed, arms held at her sides by the internal sleeves. 


Laces pulled tight reveal every curve of her form. 
There is no going back for her now, no escape until you decide to let her go. She will wiggle around, struggling against her bonds, enjoying the embrace of her leather cocoon. Softly moaning and breathing heavy as she takes turns rolling over and resting - leather hood pressing tightly against her lips. 

After stewing a while, her laces are pulled tighter, molding the leather ever tighter against every part of her body: legs, fingers, ass, arms and shoulders. It's harder to move now, her breathing more labored. It's more difficult to roll over, but she is having fun trying. The struggle is beautiful to watch. 
Added straps and a locked collar complicate her predicament, yet she still manages to roll herself over.

And if you're a fan of the forced "O"... Well let's just say the ending is a happy one. 

Well, leave it to my friends at Restricted Senses to make this dream scenario come true using a sleepsack I made. It's such a great video: nicely lit and high-definition. At a completely reasonable price. Do yourself a favor: download the video here and enjoy this sublime piece of extreme bondage art. For me, this is a dream come true. 

Muffled laughter from our tightly-bound slave. Could it be she is actually enjoying herself in there?