Thursday, January 3, 2013

F-suit for Vanilla Gallery - Leg Pockets

Now that we have the arm pockets and body partially finished, it's time to work on the leg pockets. 

I've gotten into the habit of marking left and right pieces so things don't get mixed up along the way. 
The first thing I am going to do is sew the zipper into the front panel of the leg pocket. I've started experimenting with a different way of sewing the zippers. Instead of doing it with the zipper together, I separate the teeth and do one side first. The zipper stops just short of the knee-seam. 
 Once that first half is sewn in, I zip the other part together with the slider. 
 The top of the foot pocket is sewn in until I reach the zipper. Then I stop to glue down the seam allowance for the outside leg. 
 I glue right up to the beginning of the zipper. 
 Once the glue dries I fold over the seam allowance and sew the other half of the zipper in place. 
 I'm taking this zipper all the way to the end of the foot pocket, so it will run along the edge of the leg, from the knee to the toes. 
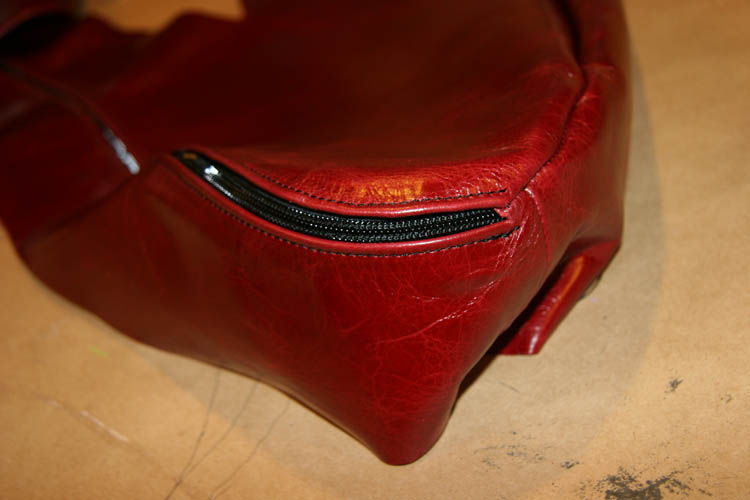
 That went well, and I end up with a nicely-shaped knee pocket. 
 Both sides have zippers in...
 Time to cut a couple of strips for tongues. 


Because the leg pocket can open wide, it's pretty easy to sew the tongues into place freehand - without tape or clips. 

 Tongue complete!
So, zippers and tongues in place, we can proceed with the 2nd side of the leg pocket. 
These just get clipped in place and sewn. 
Done... 
And next we clip the bottoms of the foot pocket...
Done and done...
 We can turn these right-side out. Everything look OK? Good! Time to glue down all the rest of the seam allowances inside. 

 And that pretty much takes us to completion on the leg pockets.  

F-Suit for Vanilla Gallery - Arms & Body

I'm using a new hide for this project - Absolute from Hide House Napa in "Tamarillo" color - a deep, rich red. They ship without folding the leather, so the mailing tube ends up being around 8 feet long! This one definitely won't fit in the mailbox... 

The leather has an almost automotive-looking finish. 1.2mm thickness. 


One thing about the hide, it's a bit more distressed than I could gauge from the 3x2 inch sample swatch... You never know exactly what you are going to get until it arrives... and every hide is different. I can't wait to see how this will turn out...
The hide measures just over 51 square feet, and you can see how big that is on my layout table - lots of overhang. My work table is 8 feet wide and 54 inches deep with the extension.  


All the pieces cut out and paired up:


Because the 2 leg pocket pieces are similar but different, I want to be sure to mark them so they don't get mixed up.  These are the outside leg pieces.

Just a little number in each corner should do it. I also mark the torso with the same numbers, so all I have to do later is match up the leg 2 to the torso 2. It's a good habit to get into...

My surgical prep blade come out to skive the edges. 

I'm doing this when I don't want to see the seam allowance on the front side of the piece. It can be more of an issue with heavier leather. 

Front panel halves clipped together and ready to sew...

This is the seam at the knee area of the foot pocket. Breaking long pieces down into multiple parts allows you to make more efficient use of the leather. 

Cut relief slits around the elbows in the arm pockets...

Rear panels of the arm pockets sewn to the side panels.  

Now the front panels clipped on for sewing.  

Before I sew the front to the rear of the body panel, I make up a bunch of D-rings to be set into that seam - at the shoulder, under the arm, and at the hips. One extra for the top of the hood. =0)

These D-rings get inserted with just the tails sticking out for sewing. I usually mark the pattern so the alignment marks are symmetrical on both sides. 

All clipped up and ready to sew... 

Once sewn, it's time to glue down those seam allowances. 

And here we have the finished torso: 

Seam allowances glued down on the arm pockets:

And the knee seam glued...

...and flattened.

Maybe a quarter of the way done at this point? 

F-suit for Vanilla Gallery - Patterns & Prototypes

Hope you all had a nice holiday and New Year's eve. I did, although most of my waking moments lately have been spent working on the f-suit I'm making for the upcoming Vanilla Gallery show with Karen Hsiao. The design is going to be a full-coverage f-suit with attached hood, and it's to be displayed suspended from a hook in the ceiling...

This is a cool project, as it gives me a chance to do something I've always wanted to do: A variation on the f-suit that pivots the leg position around, so it will function more like a hogtie. The poor slave inside will be pretty helpless and trapped in a belly-down position. I envision it actually being suspended with a person inside eventually, but that will have to be worked out at another time, and would require a separate reinforced harness. But for display purposes, D-rings sewn into the body of the f-suit should suffice. 

I am going to use a heavy red leather to reference back to the black cherries theme. I'll also need to come up with a new pattern for the zippered hood, as I think it will look cleaner than it would with laces at the back. I want a sleek, beautiful leather envelope...

So, first off, I need to create a pattern for the new leg pocket. I'll start like I normally do, with a duct-tape over plastic wrap.


 This usually gets another layer of tape, which helps smooth out the shape, and keeps the parts together as it is cut into pieces. I will then use a Sharpie to draw lines where I want the seams to be. Normally, I would create a wrap for both legs, and average out between the two pieces, but because this is such a strict position, I wanted to spare my fit model the ordeal of having both legs wrapped. Doing both limbs does give you an advantage in allowing you to adjust for any asymmetry in the body. 


 I love the look of a wrap when you can see the anatomical details, as here the clear separation between the upper and lower leg. The shape of the foot, too!


 Once I'm happy with the position of the marks, I'll cut along the best lines to get my pattern shapes.


I end up with large panels forming the left and right sides of the foot pocket. 


Another couple of panels form the front and back of the pelvic area. I'm planning on merging this design with my standard f-suit pattern. 


There is a center strip that runs from the top of the thigh to the tip of the toes, the bottom of the foot pocket, and a portion for the waist-through-the crotch. 


Each of these pieces gets transferred to the butcher paper that will become the working pattern. 

These get rough-cut into a big pile...

...and final trimmed to shape. 

Before I commit to making the pattern in leather, I want to do a test or proof of the pattern in an inexpensive vinyl first.

It's much better to discover any problems at this stage rather than after everything's been cut out of leather. 

Everything goes together like it will in leather, with clips and sewing. 

But I don't bother trying to glue down the seam allowances. First, because it's not necessary and second because it's near impossible to get the seams to stay down in the vinyl - at least with the contact cement. If you ever do want to glue down seams on vinyl, I'd recommend using a latex-based adhesive. 

That's about it for the pattern and vinyl fit test. If this checks out OK, I'll be ready to move on to making the final in leather...