
I start off with 2 pieces that make up the body of the armbinder. I worked up a few prototypes in vinyl first, to make sure the sizing is right. Because this piece will not have laces to adjust the fit, I want to make sure the pattern is perfect.
 I have indicated where the zipper will begin, and because I won't be able to sew inside once the rear seam is closed, I need to actually sew the zipper on first for this project. That's the reverse of most projects I do, as sewing in the zipper is usually one of the final steps.
  I start by trimming the corners:
 ...and cutting slits at the zipper stop end. These need to extend into the panel about half the width of the zipper chain. It's only about one-eighth of an inch on either side.
  Next, we'll glue up that seam allowance.
  Here I've turned down the glued seam:
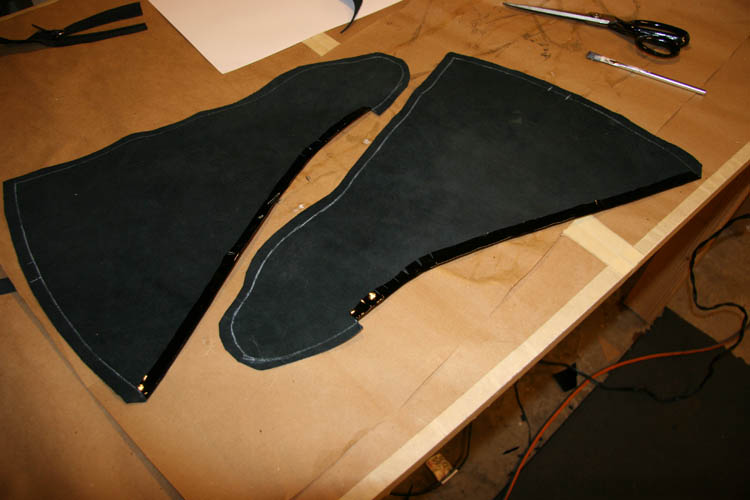 You can see where I cut slits to allow the seam allowance to follow the contour of the curve.
 With both seams flattened I'm ready to sew.
  But before I sew the zipper in, I want to sew the tip of the hand pocket. Actually, at this point, I only want to sew half of the pocket, as I need to be able to open the piece flat to sew in the zipper.
  I mark the stop point with the pencil.
 And here we have the partial seam sewn.
 Now I'll glue and flatten that portion of the hand pocket.
 And now I flatten the seam.
 Here's the view from the outside:
 Now I'm ready to set in the zipper. I use masking tape to hold the zipper in place while sewing.
 I start at the hand pocket end and run the zipper along the edge to the top.
 And then I stitch it in place with the sewing machine.
  I use another length of tape to hold the other side in position.
Then I stitch that side of the zipper in place as well.
 Here's a closeup of both sides stitched:
 At this point I trim the zipper to length, and use a match to singe the edges of the zipper tape to keep it from unraveling.
 It's starting to take shape... Kinda looks like a Darth Vader helmet at this point.
 Before we close up the back seam I want to place the tongue. It will keep any part of the zipper from touching the wearer, especially in the hand pocket.
  I use tape again to hold the tongue in position for sewing...
 ...and topstitch the tongue using the previous row of stitching as a guide.
  Now it's time to sew up the back seam. But before I do that, I want to insert a D-ring at the end of the hand pocket. I use a piece of leather from a thicker part of the hide, and cut a small strip.
 This is placed inside the two pieces of the armbinder, in about this position.
 Here is the workpiece all clipped up and ready to sew:
 Once that back seam is stitched, I glue it as well as the top edge seam.
 For the contours of the hand pocket, I cut relief slits or notches as needed for inside or outside curves.
 Once dry, I flatten and press the seam allowance into place.
 At this point, it is starting to look like an armbinder!
 I really like how the shape of the hand pocket turned out. You can see the little contour for the thumbs.
 Next up: time to make some straps. I need 2 straps of 33 inches, and another segment of 12 to 16 inches for the buckles. They need to be about 2.25 inches wide.
 Here are the raw strips, which I will...
 ...glue, and then...
 ...fold over to make the final straps.
 Perfect... These are really shiny!
 Tool Time: This is one of those cool tools that make you life easier, especially when you are making your own straps. This Osborne strap end punch cuts the end of a 1-inch strap into a nice curved shape, perfect and clean every time. These tools are over $35 apiece, but they do a great job, and are very well made.
 You just place it on the end of the strap and strike it with a mallet.
 Voila! Perfect strap ends every time.
 I'm also cutting reinforcement tabs at the same time. These will help us connect the straps to the body of the armbinder.
  The strap ends laid on the reinforcement tabs:
 Here they are after being sewn. I use tape to hold 'em in position while sewing.
 At this point I glue up the reinforcement tabs and the armbinder.
  Honey, you don't mind if I borrow the hair dryer, do you? (When the weather turns cold, it sure helps speed up the glue drying!)
 When the glue dries, I set the tabs in position then sew along the edge of the strap through the reinforcement tab. This gives the outside a clean look.
 Here's a view of the inside:
 Now we're on to the buckle end of the strap. I start with 2 lengths of strap, and the buckle and keeper hardware:
 First I want to punch the slot for the buckle's pin. For this I use a slot punch.
 Another purpose-built tool that makes a neater hole than you could without it.
 Just center and strike with the mallet.
 Perfect slots...
 A couple of holes punched and rivets set, and we have our buckles ready to go.
 At this stage I want to sew these onto their own reinforcing tabs, and it's the same procedure as with the longer straps. Tape in position...
 ...then sew on the machine.
 Then they get glued...
 ...and sewn into place.
 Looks nice from the outside:
 And lots of stitching on the inside for reinforcement.
 That almost completes this project. I just have to punch holes in the straps, but to do that I want to fit the armbinder to my model. I want to make sure that one set of holes is in the "just right" position. I'll be posting final beauty shots of this project (as well as the patent butterfly straitjacket) in an upcoming post.
  Until then, take care - and thanks for following along! I hope you enjoyed the project.
Simple :D effective :D and lovely :P
ReplyDeleteThanks LT, yours is coming soon!
ReplyDeleteYeeeeah! ;D
ReplyDeleteHi Christopher. I am a friend of mark from Serious Bondage and he told me about you last year. I have wanted to contact you about making some things for me and other business opportunities. I also have a leather sleep sack in need of repair. Your work is so incredible I am really anxious to contact you and meet with you. Can you tell me how I can get in contact with you via email?
ReplyDeleteDear Gwen,
ReplyDeletefeel free to contact me at christopherfetish(at)gmail.com.
Small World !! ;-)
ReplyDeleteJust cruised through and discovered you are the *Christopher* cartoonist/artist who turned me on to four-legged animal play several years ago! You aren't as well exhibited on the net as other artists, but certainly no less in demand than the best fetish artists (in my thinking).
Christopher, would be nice if you post the pattern of the projects. I live on south america and its expensive bring that things from outside, so im starting to make my own stuff. I make the hood and its awesome, i cant belive that i have it :) ty so much for this great blog.
ReplyDeleteDear THE,
ReplyDeleteI will post the pattern for this project in the near future, and I hope to have instruction sheets for download as well. Thanks for the comment!
High praise, PateInduced! Thanks much for the compliment. It's great to have contact with others who appreciate my work.
ReplyDeleteAppreciating work you made me overwhelm thanks for the pattern.
ReplyDeletefrom leather armbinder