Been busy working on the armbinder pattern, trying to get the fit of the hand pocket just right.
I think I finally made a breakthrough, but not without some trial and error first. You can see the final result below on the left: A slightly more generous sized hand pocket at the end of the same armbinder shape that I have been using for many years. The problem with the old armbinder pattern has been that the lacing panel doesn't come completely together at the hands when the armbinder is on, and I want it to. Initially I wanted the ability to cinch down the hands all the way to the fingertips. But I've come to think it looks better if the hand pocket is completely closed, and the lacing panels can meet.
The danger is: I don't want it to look oversized either. The fit and size have to be just right for this to be a success.
To arrive at the new shape I went through four separate prototypes based on the tape wrap I completed a couple of weeks ago.
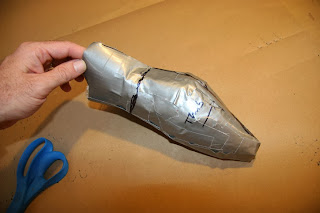
You can see from the wrap that the hands definitely have a rounded 3-dimensional shape, especially at the base of the thumbs. I considered the idea of having darts across the hand to help create that curved shape, but wasn't sure I would like the way that might look. A seamless leather pocket for the hands would be best.
I made marks on the wrap to indicate the transition from hand to arm, and also the point where the hand pocket should begin. In my original armbinder design, the lacing goes all the way down, almost to the tips of the fingers. In this version, I want the lacing to start further up the hand.
The first go represented a radical departure: a spoon shaped third piece that could help create the pocket for the thumb side of the hands to fit into. This turned out to be a real pain in the ass to sew...
...which in itself wasn't a reason to abandon the idea. Ultimately, it didn't do much to create the contoured shape, even with all that effort.
Of course, it took a second try before I ruled it out completely.
Prototype No.3 went back to a 2-piece design. But it ended up with a pronounced hump on the thumb side, that needed to be flattened out a touch. But I was getting closer... The fit was looking really good.
Ultimately, after some modifications to the No.4 prototype, it was time to see how it worked as a full working armbinder pattern.
I also took the opportunity to experiment with a different way of attaching the buckle strap: making the strap straddle the end piece at the point of connection......instead of placing the buckle completely under the flap, as I have done up 'til now.
Taking copious notes along the way (of course), so I can come up with a standard way of doing it from here on out.
I still don't have a definitive answer as to whether this has worked or not, as the test fitting has yet to take place... but I'll let you know as soon as I find out.


No comments:
Post a Comment