Wednesday, June 1, 2011

Hood form wrap test 1

Now that I'm done carving the wooden head form it's time to test the thing to see if it actually works. Kind of like testing your answer in math class, where you put your answer into the original equation to see if it works out correctly...
In this case I'll be making a tight wrap of the form using plastic wrap and duct tape. If the form is accurate, the fit of the test wrap on my model should be perfect.
I draw a line at the rear where I am going to cut off the wrap.
Here's the wrap cut off of the form. It's amazing how well it holds the shape.
Now, where did my fit model go...?
The final result? It fits incredibly well, save for the chin - which is a bit too snug. I am going to add some wood there, and fine tune the shape until it is just right. I am really looking forward to using this form, as it will allow designs that I couldn't accomplish any other way.

Tuesday, May 31, 2011

Carving a hood form

Hello folks! Hope you are all doing well... This past weekend I finally got around to a project I have wanted to do for a while now: to carve a 3-dimensional head out of wood. The reason I want a head shape in wood is to use it as a kind of last, the kind that a shoemaker would use to build a shoe around. I also was hoping to use it as a sort of stretching form, for breaking in the hoods I make. Up to this point I have done this breaking in on a Styrofoam head, like you might find at a wig shop, but there are problems with the proportions on those - the lower half of the face is way too small, and that's one area where I want to help stretch and form the leather - particularly around the chin. I have never carved anything out of wood before, so I won't even pretend to know what I'm doing, but as usual I wanted to share in case anyone can learn from what I have done. I started off by gluing 9 pine boards together, forming a solid block measuring 6.75 inches wide, 9 inches deep and 12 inches tall. These were clamped together and left to dry overnight. I then traced the shape of the head profile on both sides of the block, and the widest head circumference on the top.
I tried to remove as much material as possible with the table saw first, so I made angled cuts at all four corners. This gave me a rough octagon shape.
Next I made a series of cuts on the table saw, moving the fence about a quarter inch between cuts. The height was adjusted each time to follow the contour of the outlined profile.
Here we have the front...
...and the rear.

At this stage I chipped out the slits with a hammer and chisel, giving me a rough profile shape.

Next, I made a couple more cuts at the table saw, taking out a slice at the top of the head, and at the neck. The less I have to take out with the micro plane and chisels, the better. A very cubist-looking rough cut.
Now the shaping begins. I started to round off the form using a micro plane.

I used paper guides to help me get the proportions right - the idea came from a book I just read about carved wooden masks for the Japanese Noh Theater. Apparently, the mask makers use paper guides as well.
These were the main carving implements used on this project. The micro planes were handy for large areas that needed to be removed, and the Pfeil chisels were for the more subtle, nuanced work. These chisels come sharp, and cut through the wood cleanly and beautifully. I bought 3 sizes for this project, one with a slight sweep (or curve) a 2/25, one with a more pronounced curve (the 6/25) and a small one with a deep sweep (the 9/13). For those of you who care, the first number refers to the depth of the sweep, the second number is the width of the blade in millimeters.

It's the first time I have carved with chisels, and I must say it wasn't as difficult as I thought it would be.

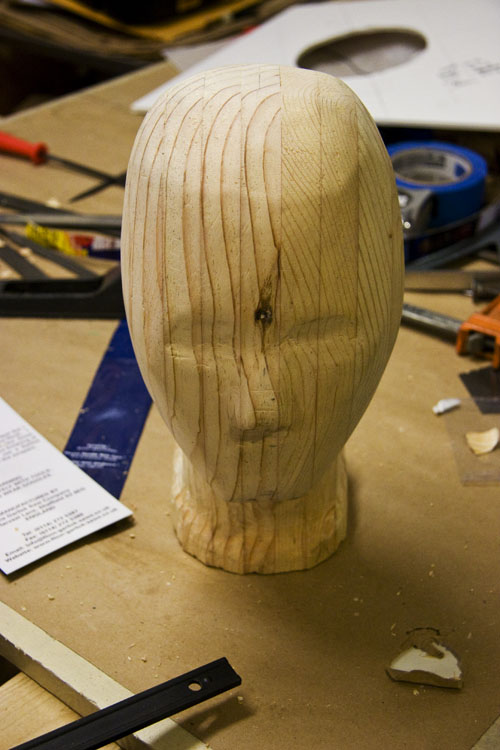
At this point we skip way ahead, as I didn't take many progress shots along the way. Suffice to say there were chisels involved, lots of hammering and sweating, some cursing, a trip or two to the hardware store, sore muscles, heat exhaustion and lingering body aches. The 5-inch deep pile of wood shavings on the floor is testament to the battle that took place, and the end result was this not-too-shabby wooden form:
No, the knot in the middle of the forehead was not intentional... It just turned out that way!
I really like the way the wood grain runs top to bottom, helping describe the form. Seeing the different layers is pretty cool as well...
The grain in back almost makes a bulls-eye.
Overall, I feel like I learned a lot from this project. I have now tackled a carving project, and it didn't turn out too bad. I would do a few things differently next time (like leaving a bit more material to work with at the chin and nose), but in general I am getting over any fear I might have had about carving in wood. Just do it, right? Until next time...

Monday, May 16, 2011

Sleepsack pattern making

A lot of people ask me how I go about making patterns. In my opinion, the best way to start off (in order to get a detailed, custom-fit) is to make the pattern directly from a wrap of the slave or subject, in this case a complete head-to-toe mummification wrap. The objective isn't to create a bondage experience, but to create an envelope that records every contour of our subject, so THAT can be used to create a leather restraint that can provide a bondage experience. I use a layer of plastic wrap, followed by the duct-tape. It usually takes two to three rolls.
It's a particular challenge to make these larger pieces, like sleepsacks and f-suits with integrated hoods. Doing this sort of work made me realize why attached hoods aren't commercially available as a standard item: there are just too many variables in the way people are shaped, and making something that would fit someone "off-the-shelf" would be almost impossible. We are all unique.
I have probably mentioned this before, but I am always amazed at the variation between two models of the same height and weight. They could have vastly different proportions, including waist size, breast, hips and feet. The more fitted you want something to be, and the more picky you are about it, the more likely you will need to start with a wrap. I think of it like taking thousands of measurements all at the same time, and without using a ruler.

Note: You don't want the wrap to be too tight. Although duct-tape is pretty good at holding it's shape, if you make it tight, it will shrink after you remove your subject - resulting in a pattern that is too small. Keep it contoured and snug, but don't over do it. I try to use at least 2 layers of tape throughout. This also helps hold the shape.
Once the wrap is made, I mark seam lines on the duct-tape using a sharpie. Of course, I first cut the subject out, and re-tape the wrap closed. Unless I'm feeling mean. Then they stay in for this part...

These lines guide me when I cut apart the pieces and transfer them onto paper to make the pattern. Ideally, the left and right pattern pieces would be the same size and shape, but there is always variation between the sides. I use a process of averaging to make the pattern pieces symmetrical.

Where the seams go and the shapes of the pieces are guided by experience. In general, I try to keep the number of seams to a minimum. Certain shapes suggest themselves: when you try and flatten a complex shape like the shoulder, a single seam can help create the ball-like shape of the shoulder at the top of the arm. I try to pick lines that will be clean and pleasing to the eye.
At some point along the way, I'll make a drawing showing the piece, with seams, zips, closures and construction details in place. It helps me visualize all the patten pieces, how they relate to each other, and where I will cut them out of the hide. Finally, we can move on to the fun part: actually making the piece.

Monday, May 9, 2011

Zippered Armbinder on Anna Rose!

I just received some pictures of the zippered armbinder from Anna Rose, of Alterpic and KinkyPonyGirl.com fame. (Thank you, thank you, thank you!) This was the armbinder construction project detailed step-by-step in back in February. She looks just incredible in it, don't you think? I love the action shot!
I was going to post the pattern for this design, but I wanted to make sure everything fit just right first. After seeing the pictures, I feel like I could make a few adjustments to the pattern. It fits nicely in the front, and the straps cross nicely across the chest.
The straps were made extra long, as they could be trimmed down pretty easily. But, I kind of wish the rear panel came up higher... (although this does show off her tattoo). I feel like it could go up another 3 or 4 inches... Plus, the bottom of the arm pocket could be a little tighter - I see wrinkles. =0( I do like the fit of the hand pocket, though.

Besides, these days I don't feel like I am done with a project until I've done it at least twice...

Well Anna Rose, what do you think? Let me know, and thanks again for letting me post the pix.

Wednesday, May 4, 2011

F-suit v2.0 Photos

Sometimes I am lucky enough to have a client share images of the finished product with me. These are great to see from a production standpoint, as it helps me to know how things ended up fitting - or not fitting in some cases - so I can work towards improving my design patterns if necessary. In this case, the client not only allowed me to see images, but was OK with me sharing on my blog as well, which is really very generous of them. (Thank you client!) I was happy to see the final f-suit fit so perfectly, and paired with their own hood, these pictures are just as sexy as hell!
The f-suit is an unusual restraint, in that you are completely enclosed, but still have some form of restricted motion. You can wiggle around, but movement is limited, and escape is difficult, if not impossible. You become a sort of helpless leather-encased sex toy at the mercy of your partner/master... The shot above shows the pointed-toe pocket, fitting as it should, just like a glove. If you have been following my blog for a while, you may remember this was the problem in the last version I made: the foot pocket was too short. This time, we got it just right!
This picture is great, too. I love the position, and her pointed toes are just perfect!!
And for those of you who were wondering (SAMMY), this is what the 2 tongues at the crotch looks like... =0)

Take care, until next time...

Friday, April 29, 2011

Locking bondage hood v2.0


Hello all! I'm posting some images of the hood I just finished up that goes with the armbinder from my last post. I decided to re-do this piece as well, as the tongue didn't allow an easy on-and-off experience for the client, and I felt that I could do a little better. Based on the photos and feedback they sent, I knew there were some things I wanted to change.

The tongue on this piece is made a bit larger, and made of a lighter matching leather, that will allow the tongue to stretch a bit more than in the previous version. It should make getting it on and off easier.

I also extended parts of the rear panels slightly, which should result in the lacing panels coming slightly closer together when the laces are pulled tight... Still not touching, though - it's always nice to have room to go tighter if you need to, don't you think?

Last time there was also a problem with a grommet whose backing washer came undone. This is probably because I was using a grommet that was too small for the thickness of the leather. I was trying to keep everything petite since the scale and size of these restraints is so small. Since I up sized the grommets on the armbinder, I wanted to also up size the grommets on the hood, to make sure both pieces would match perfectly.
This is a real intense hood to wear, as the leather is quite thick. It is soft, and will stretch some (especially over time), but the feeling inside this hood would be quite severe. Not for panickers or the claustrophobic... Unless you want to be really mean! For serious players only.
This time I tried a different approach on the locking strap. I sewed the strap from two parts, using the same leather as the hood on the outside, and a patent leather on the inside. I think it results in a thinner strap, and the patent (being stiffer) doesn't stretch as much. Stronger and thinner was the goal.
I think it came out nice...
Also, I managed to find a small D-ring (shorter than the hasp I used last time), and made the connection with a single rivet. It looks really clean, and anything that reduces bulk around the neck is a good thing. I think this is my new default method.

One final tweak to make sure it is easy to get this hood on: a zipper on the tongue itself. This allows you to open the rear quite wide. Pull the zipper down, and no hair in the laces - good times.
This hood (and matching armbinder) came out really great. Now that both pieces are done, I get to send them off to the client, and hopefully they are happy with their new toys as well.
I can't wait to hear what they think!

Monday, April 25, 2011

Square armbinder v2.0

These are pictures of the square armbinder project I recently re-completed this past weekend. Yes, it seems like everything is taking 2 tries these days (welcome to perfectionist central)... Have I mentioned sometimes making leather bondage gear from scratch is a challenging thing to do?

Seriously, there were some problems with the first version of this restraint, and I wanted to make everything as right as I possibly could. In a quest for a tight fit we ended up with a restraint that was too much of a struggle to get into. Note for future reference: If it takes more than an hour to get into your restraint, it is probably too tight!

I also had reservations about the rolled seam around the arm opening. In order to make it as strong as possible, I turned the edge of the opening before applying the leather edging. This created 2 thicknesses of leather, plus the 2 thicknesses of the rolled edge, for a total of 4 layers - I felt it might be too much, but it was something I couldn't be sure of until it was tried on by the client. Sure enough, it seemed like it was a bit too stiff in practice.
So, numerous changes were made to the pattern, some quite minor, others more extreme. The entire body of the restraint was made a little longer - about 3/4 inch. The goal was to loosen things up a bit, without compromising the "inescapability" of the first version. I didn't want to go too far.

The width was increased by about one-quarter of an inch on each side. This means the laces, when pulled tight, should get closer together in the rear, but still not quite touch.

Based on the photos I received from the client, I noticed a little slack at the bottom of the "bag" that encases the arms, so that lower contour line has been straightened out a little, for a tighter fit.

The zipper was made beefier - I am using a custom-ordered (direct from YKK) #10 black-oxidized brass zipper - the entire exciting 2-month process of obtaining this zipper will be the feature of a future post. It was not easy to get that zipper, let me tell you.
Finally, the tongue in the rear was widened by about 2 inches, which should make getting into this restraint much easier... It now opens to about 5 inches wide, compared to about 3 inches before.

Oh, and the grommets have been placed a little closer together - 1 inch spacing, vs. the 1.25 inches used last time.


And just completely list all the changes, the grommet moved up from the size "00" to just plain old "0" - it's a slightly larger grommet. There was a grommet failure on the previous version, where the back part of the grommet became separated from the front part. This probably stemmed from me using a grommet that was too small for the thickness of the leather, which kept the grommet from getting enough of a grip on the rear part. You see, the smaller the grommet, the shorter the length.

It was completely my fault, as I was trying to keep all the hardware as petite as possible on this petite piece. Sometimes slightly bigger is better. And sometimes it takes another try to get to everything "just right". Another lesson learned...