
Of course, not all wraps are created equal, and ideally I would be able to make the wrap myself, but in this case I felt it could still be of some use. It was of stiff tape (there are different kinds of duct-tape out there, and I think the cheaper, thinner tape can sometimes make a more close-fitting wrap). Also, it was only one layer over cling-wrap in most areas - enough to hold it together, but not exactly smooth-contoured, as you would get with 2 or three layers. Still, there was lots of great information contained within the wrap, so I was happy to have it.
 My first step is to straighten and even out the wrap as much as possible, taping the shape closed. I then mark lines corresponding to the shapes of my master pattern. Basically, I look for the centerline from both the front and sides - so the 4 pieces are roughly equal in dimension. Next, I cut out the shoulders, again referring to my master pattern for guidance on the shape. Usually I will take the first one cut out, and use it as a rough guide for the second shoulder.
  On a clean sheet of butcher paper, I have traced the master pattern in pencil first. Then I lay the duct-tape cutout shapes on top and trace the outlines - first one side, then the other.
  I usually use the neck opening as the starting point - it helps to have a common reference point between the three shapes.
  Here you can see the black pencil, showing the master pattern, and the green and orange outlines for the duct-tape pattern. I knew the height of my client was a couple inches taller than the master pattern, so I was glad to see this came through in his wrap.
  The same idea for the shoulder. I know the overall shape of my master pattern will work, it is just a matter of integrating the size differences without compromising the shape.
  Now all the pattern pieces have been re-drawn with the new sizes, and the shapes are cut out. Here we have the hood, shoulder, foot pocket bottom and side...
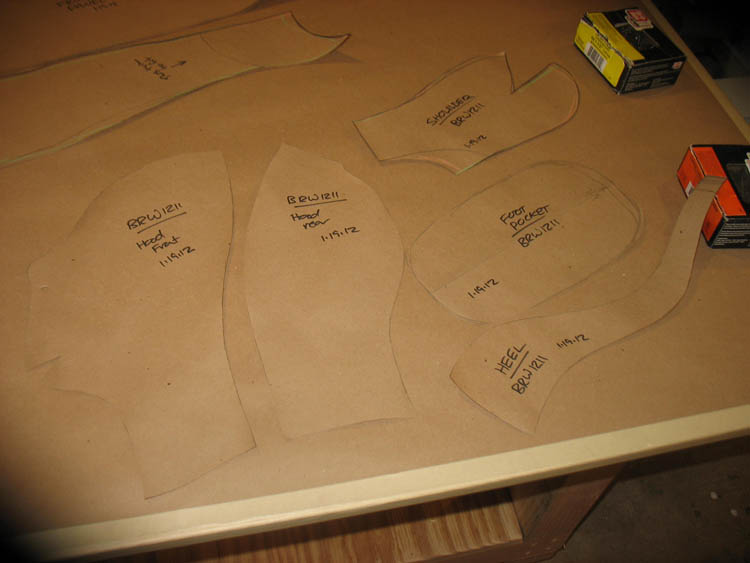 ...and the large panels for the front and rear of the sleepsack.
  At this stage, I want to proof the pattern before making the final in leather. It's better to catch any mistakes or problems in the pattern now, as it will be a much more expensive proposition later.
 I just finished reading a great book on custom shoemaking, and was suprised to find that they make test-fit shoes as well - to proof both the last and the pattern. Our test will be in vinyl, and should give us a good idea of the overall fit.
 Here we have all the pieces cut out, and ready for sewing.
  A few hours later, and we have the prototype ready to send off to the client. Since I have already covered the process of making a sleepsack on this blog, I won't go into all the details again here.
  It is a lot of work to go through just for a prototype, but it will be worth it to know that the pattern is good, and that the leather final version will fit like a glove.
 Until next time, take care...
wow, i love watching you work. it's like nothing else i've ever seen. :) keep up the great work!!!
ReplyDeletesammy, I'm glad you like to watch. You have to let me know if you ever want something... You'd get the frequent blogger comment discount! =0)
DeleteJust about to do the same thing in our shop..
ReplyDeleteAlways a trill to see your creations take form..
one word AMAZING..
BestRegards From Sweden
SFL, thanks, and I look forward to seeing your work!
DeleteYou are the BEST! It is because of your example that we made a leather square backed armbinder (the most used item in our toybox) and are now going to make a sleepsack too! I hope that you will post your pattern for making this particular item soon. I assure you that it would be well used by a very grateful couple.
ReplyDeleteThanks, Her Frey - I do want to post a pattern for the sleepsack, but scanning the pattern in without distortion is a bit tricky. I'm working on it!
Delete