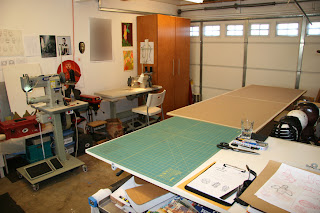
I have some people who contact me about the equipment I use, so I wanted to do a couple of posts about my workshop and equipment. I am lucky enough to have a dedicated space to work. For years I just worked in the living room of an apartment, which meant everything had to be taken out and put away every time I used it. It's much better now that I have a place to get messy and creative, and not in the middle of the living room. I'm sure my wife agrees... right honey?

Here's my workshop on a typical Saturday morning. I've got great natural light coming in through the window, and lots of places to lay out patterns and leather. This is my happy place.
The studio is divided into three areas: layout, sewing and pounding (I'll explain that last one in a minute...).
You can see from the diagram below, it's similar to a kitchen layout, with a work triangle formed by the three most commonly performed tasks. With my projects it usually goes: cut, sew, pound - repeat. The leather is laid out and the pattern traced on the main table. The pieces are cut out and clipped together for sewing. Then, the seams are glued and flattened with a mallet (pounded), before moving on to the next part.
Most of my sewing is done on my workhorse: an Artisan 1797-AB leather sewing machine. It's a compound-feed walking foot machine with reverse-stitching capability and a beefy servo motor. I can do slow, careful work with it, and it can handle light to medium-weight leather. I absolutely love this machine!!
The other machine in the shop is a 2618-1B, a heavier cylinder-bed machine also from Artisan. I call her "The Beast". It allows me to sew inside closed-end shapes like bags or hoods, and also to handle topstitching where the arm of a sleeve attaches to the body. I have been struggling with the machine because it has a tendency to break needles, but hopefully the latest service I had performed will fix the problem. With any new machine it is hard to tell if the machine itself is the problem, or if it's just because I don't know how to use it yet (which is entirely possible). I may have been spoiled by the ease-of-use of my other Artisan machine... This machine has an even more powerful motor that would easily sew through your finger. I definitely treat her with respect!
This is an area I call the pounding station. I have a heavy granite plate that I use as a surface to pound flat seams. It also sits under the tooling pad I have when using punches to provide a solid, stable surface. Also, there's a nice little area to cut pattens and parts if needed. To the right of the granite block is my Weaver "Little Wonder" rivet-setting machine, bolted to the workbench.
I end up using the space between the rafters for leather storage, in rolls and tubes. Also, paper for design layouts and pattern making.
My main work surface is a 48 by 36 inch table I made with wheels so it could be moved around. This is supplemented by an extension on sawhorses to take the whole width of the work surface to 96" or 8-feet wide. When working with a full hide or a side, you need that much space to lay it out flat. I also use a separate 18" by 96" piece of plywood to extend the surface area if needed. Even with the extension (a full 54 by 96-inch table top), a 55 square-foot full hide will overlap the work surface a bit on the sides.
Under my wheeled table I have room for storage, which is where the thread and leather dyes live.
I have quite a few large patterns, which get stored in another cabinet I made.
My table saw gets pressed into service as a leather holding area. (It's under the pile...)
I keep my smaller pattens in 10x13 envelopes, dated and labeled...
...and these go in a drawer inside the cabinet as well.
That's about it for the studio tour today. Thanks for visiting... Coming up next time: Tools!


nice to see i like the new blog design too :)
ReplyDeletevery nice workshop. too necks mask manual, but I do not have machine
ReplyDeleteJust fantastic. There's nothing headier than seeing and artisan making it work. Freedom, the American Dream, etc.
ReplyDeleteWe're all waiting to see some projects that really require & apply the cylinder bed stitcher.
Thanks apullin - It's definitely been my dream to have a workshop like this! I've worked on a couple of things with the cylinder bed in the past week, which I hope to post soon...
DeleteLooks amazing your workshop i see you have a new sewing machine too.. once you get the first real machine there no stop..
ReplyDeleteBr from Sweden
It's true. There are certain things you can only do with a particular machine, so you end up getting more as time goes on... I have about 2 others I'd like to get, if I only had the room!
Delete