
I came up with the original pattern for this posture collar a number of years ago, and I really love it. The posture collars on the market at the time didn't fit very well, so this was my attempt to make one that fits better. I like this one because it does fit extremely well, and it is nice and tall and restrictive. You could always modify the pattern to make it shorter, or to fit a larger neck.
We start with the pattern, which is available here as a PDF. Please ignore the writing on my pattern in the photo below - the collar is actually 3.5 inches tall in front (not 2-1/2").
 Unlike most of my projects, which are made of garment leather, this one is going to be made out of what is called vegetable-tanned leather. It is stiffer, heavier, and used for making belts, holsters, and basically anything that you want to be tough, strong, and to last forever. This hide is a 7-8 oz weight, and I ordered it from the Hide House in Nappa Valley, CA.
 Because I'm not too worried about leaving marks on the edge (as it will be rounded off later), I just use a ball-point pen to trace out the pattern on the leather.
  Next, I use my straight-edge knife to rough-cut out the workpiece. This blade is by Osbourne tools, and can be easily resharpened. Leather, especially this heavy-weight veg-tanned stuff is very abrasive, and will dull your blade quickly. It is way too heavy and tough for the scalpel or scissors I usually use.
  Rough cut complete...
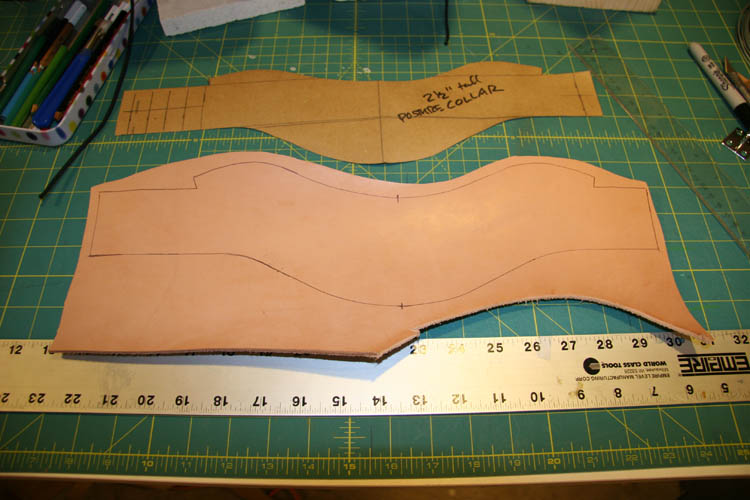 Next up, time to pull out the x-acto. You should use a fresh blade, as ideally you will cut through the entire thickness in one stroke. You can pull the knife more than once through the cut, but will need to keep the angle you are holding the blade as consistent as possible so you have a nice, clean, square edge. This can be extra hard to do on the curves, so a sharp blade is vital.
  Now we're done with the finish cut stage. You can breathe again.
  Next up, is the edge-beveller tool. This will round off the cut edge, and you will want to use it on both sides all the way around the piece.
  Here's a closeup. See the cutting edge between the two guide posts? It forms a little channel to limit your cut, keeping it consistent all the way around. It's almost too easy.
  Action shot!
  And, here's how we look after that:
 Normally, to finish a raw edge like this, you would now "slick" it using a burnisher and something like gum traganth. This smooths and polishes the leather fibers along the edge. But, initially I was planning on putting a rolled edge on this piece - so I didn't go through with that sort of edge treatment.
 Next up, time for the patent leather that will go on the outside of the collar.
 Because of the thickness of these 2 pieces of leather, you have to make sure your outer layer is longer than the inner layer - as it will take more room to cover the inner piece once you start to from the curve. Think about a racetrack: the outer car has further to go than the car on the inside lane. Same principal applies here.
  Once I have my outer piece cut, they both get glued up.
  At this point you can see the two pieces stuck together, and they are taking on the curved form.
  If you glued them together flat, you would never get them to take on the shape of the curve. Once you have them curled and glued, they will have no chance of laying flat.
 Once the glue has set up, I trim the outer patent to match up with the inner veg-tanned leather carefully with the x-acto knife. It's a tricky cut, as you don't want to cut into the veg-tanned leather if you can help it. Also, you need to cleanly cut the patent, as any mistakes will show in the final piece. There's no "undo" button.
 This is the part where I go for the sewing machine. The cylinder bed is perfect for this curved collar shape, but if you don't have a sewing machine, you could always punch holes along the edge and hand stitch the two pieces together.
  Stitching complete...
 Now it's time for the hardware. I was looking around forever before I located a source for the little locking hasps I'm using on this project. I couldn't find them anywhere, partly because I had no idea what they were called which makes it difficult to do a google search. Well finally I discovered a place that has all kinds of hardware for leather craft - and not the usual tandy-type country/western conchos and stuff. More modern, chrome (and even some S&M style) hardware too. It's called Ohio Travel Bag and the part is a 1-1/8 inch welded chrome staple plate! I can't explain to you how happy I was to find that stupid part... STAPLE PLATE, STAPLE PLATE!
Anyway, first we need to mark a position for the staple plate to be attached, and because marks won't show up on the black patent leather very well, I use masking tape as a temporary surface.
 Once the tape is down with the center marks, I can position the staple plate and mark the hole position.
  Next, I punch out the holes and check for alignment. Looking good!
  I am going to attach the staple plate with another new piece of equipment, this time from Weaver Leather. They have a little-wonder benchtop riveter that does a great job on projects like this. It's a bit snug because the holes are so close to the staple, but I just manage to set the rivet without a problem.
  The trick with the rivets is selecting the right length. You need to be about 1\16" longer that the material you are setting through so there is enough room for the rivet to deform inside the cap. This "deformation" is what holds the cap in place.
  All four rivets set:
 And here's the view from the back side, with the rivet caps.
  Next, it's time to cut the slots for the other side of the collar. I use the tape method again, so I can see the placement marks for the slot cutter.
  I use the pattern with holed punched at either end of the desired slot position to make the guide marks.
 Using those marks as a guide, I use the slot cutter to make the holes. I think I used the 7/8-inch slot cutter, which created a nice, snug-fitting slot for the staple to fit through. It fits like a charm!
 That completes our posture collar project. Initially I thought of doing a rolled-edge at the top and bottom of this collar, but I really liked the look of it without. It's very sleek and clean with the black patent on the outside, and the contrasting fleshy-tan inside was just cool looking.
  I decided to stop while I was ahead, and am happy I did. This collar will provide many years of play-time fun.
  Until next time, take care...
Ohio Travel Bag has been the secret hardware supplier to the kinky leatherworker for years. However their order minimums can be pretty high for the casual hobbyist. If you're only looking for the odd locking buckle or drop O ring give WWL hardware a look. (http://www.wwlhardware.com/)
ReplyDeleteThey carry most of Ohio Travel Bag's kinky stuff (in fact, I think OTB drop-ships for them) but they don't require a $100-200 minimum.
WWL may be slightly more expensive on a per-item basis however, I haven't crunched the numbers.
Thanks for the tip, Merana - I'll have to check them out! Looks like they do have some of the same stuff, even ball-gag parts and nipple clamps... You're right that Ohio Travel Bag has a minimum $30 order, and they make you sign up for an account. But I was so happy to find a lot of that hardware, I didn't mind so much.
ReplyDeletei want to try to do this, but i'm pretty sure i'd mess it up. i don't want to be a bother, but can you suggest like an ingredient list or something? 1 foot by 6 inches of leather and then a staple plate? other than tools that aren't knives, am i missing something?
ReplyDeleteI will try to put together a list for you, although with this project the hardest thing for someone just starting out would be the rivets. Instead of the machine-set rivets, you could use the quick-rivets that set with a mallet. You should give it a shot, Sammy... I would love to see what you could come up with.
ReplyDeleteHi Christopher, I find your bog really interesting, and, I have one question... I would like if you are able to make a special hood for me. I have some pictures of it...
ReplyDeleteI hope that you will be able to do that :)
Waiting your answer...
Adrien
@sammy: Leatherworking in and of itself isn't that difficult. The best 'starter project' is something like a set of wrist cuffs or a basic collar, since there are a lot of straight lines and not many (or any) curves to cut. If you have a leather store in your area they may even have classes you can attend. Just tell them you're interested in making 'bracers' for a Ren-faire outfit and you wont get any odd looks.
ReplyDeleteThe basic tools you'll likely need aside from a good sharp knife is a leather punch, Rivet setter, mallet(not a hammer!), and you'll probably want an edge beveler and slicker as well, since freshly cut leather isn't comfy at all.
If you already have 'gear' spend some time looking at how it was put together, where they put rivets and buckles. You can learn a lot by seeing how other people do stuff.
Leather is one of those mediums where the adage 'you get what you pay for' is very true. Good quality leather is rarely inexpensive. You'd be surprised how much of the cost of an armbinder or jacket is simply the leather itself!
Hi there! This is really a great project. I tried to exactly reproduce the project and got quite similar leather - I love the look of it - as of all your projects, Christopher! Thank you so much for sharing your knowledge and ideas here! Unfortunately I pretty much messed it up already. I guess I will try it again, since I still have enoguh material left. For the second try, I have two questions:
ReplyDelete1.) Is it really necessary to bevel both edges of the veg tanned leather first? I think one might glue the two layer first, than do the fine cut and finally only bevel the inner edge. I guess it sure has a disadvantage I just don't get..
2.) I have sewing maching that's obviously underpowered for this job. On the other hand, I cannot do it by hand properöy as well. How do I punch such small wholes--without breaking the needles, what thread and what needles should I use?
Thank you very much for this wonderful blog again. I should have left a comment earlier, but now that I actually start leatherworking on my own, I am even more thankful for this great blog and even more impressed by your craftmanship.
Bye
Olobar
Dear Olobar,
DeleteGlad to hear you tried, and don't be discouraged - it takes time to figure out all the techniques, even if they seem simple at first. I learn something new with almost every project!
To answer your questions 1. You don't have to bevel both edges if you don't want, but it will leave a sharp corner if you don't. And this may fray or shed over time. The beveling and finishing with gum traganth helps compress the fibers and makes the edge stronger, and look better over time.
For your 2nd question, if you do hand stitch, you are going to want to get a pricking iron or stitching chisel - these create evenly-spaced holes for you to stitch with needle and thread. Or you can use an overstitch wheel (to mark evenly spaced holes) and an awl to make your holes. These are usually set in a channel created with a stitching groover or a gouge. A great book to check out is "The Art of Hand Sewing Leather" by Al Stohlman - it covers all the basics for how to do hand stitching, and is available on Amazon. I like it because it has lots of illustrations, and everything is clearly explained.
Thanks a lot for your reply! I will get some more tools then and check that book. I will definitely continue trying, because despite some unsatisfactory results at first, I just love to built things on my own. The descriptions of your projects so precise, that even a beginner understands the single steps.
ReplyDeleteThat's just what I had hoped to do, make it easy for others to try their hand at making something special. It's not easy sometimes, but when it comes out right, to can be unique and really satisfying.
DeleteThank you for posting the pattern -- I find that figuring out the measurements for leatherworking patterns is always one of the most fiddly and least rewarding parts, so this is a godsend. :)
ReplyDeleteYou're welcome rassaku... Getting the shape right can take some time, and I could never find anything decent online when I was starting out. I figured why not share?
DeleteThanks for the comment!
You are a true gentleman -- and I am a filthy pirate, but I do try to give credit where credit is due: http://rassaku.deviantart.com/art/Angel-Wings-Posture-Collar-362356466
DeleteWow, that came out beautiful... Love the wings you added. Your tooling, all your work is just awesome! Can I do a post with a link to your Deviantart site? It's all really cool stuff!
DeleteThank you! That means a lot of me coming from you, because I've been browsing your archives and your stuff is exquisite -- there's lots of fetish gear out there, but not much with your level of craftsmanship and attention to detail.
DeleteBy all means, link me! :) I would be extremely flattered to have my site linked on your page. (And since I'm gearing up for a vendor fair on Saturday, hopefully I'll have a few more variations to show off in the next couple days.)